Image Map
Showing posts with label Social Studies. Show all posts

July 18, 2019

Rounding Numbers to the Nearest 10 and 100 for Mastery and Fun

Rounding to the Nearest 10 and 100  is one of the most basic skills presented to students-honestly, kinda boring too!  What if I presented to you the idea that it can be a lot of fun and kids can master it too!  No, really, it can be FUN and mastery can be done in just one week!  

Rounding to the nearest 10 and 100 square intro image


How to Make it FUN!  


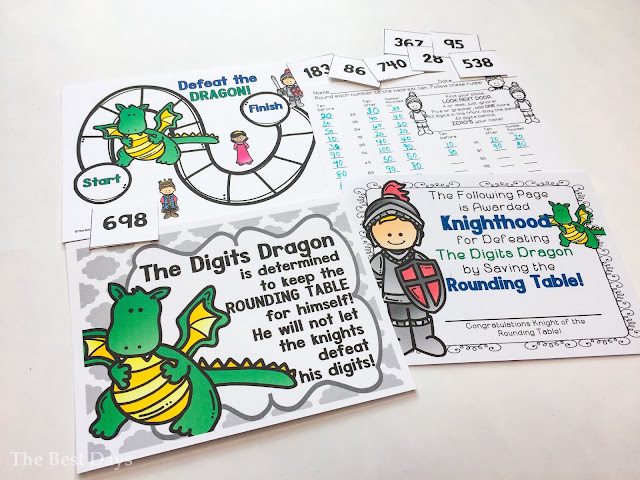
Find a good theme and go with it!  Seriously, rounding to the nearest 10 and 100 needs a theme!  That's how you make it FUN!  Luckily, a theme has been made!  May I present to you...Knights of the Rounding Table!

This fun rounding unit is set to the idea that the King needs help-and the queen steps in to save the day with an idea-an idea that defeats the Digits Dragon!!  So fun, right!  


Digits Dragon and rounding activities picture

How to Make it MORE Fun!

When I do this Rounding to the Nearest 10 and 100 unit, I accompany it with some fun information about knights and dragons!  Read a great book about Medieval times (I have an oldie but a goodie that is so old, I can't even find it on Amazon to show you the book!)  Or, even better, about King Arthur!  Or Saint George and the Dragon which is an amazing knight story!  (Grab this freebie from Scholastic!

This literature tie in makes it even more fun because students can dive into the topic in a different way-tying in this new information to apply to the math concept!  It builds a fun new experience all around!  Plus, you could even have them create a fun Digits Dragon on their own!  This adorable craft would make a great tie in to this unit!  


What about the Rounding?

Students get the opportunity to learn rounding to the nearest 10 and 100 from simple steps to the practice of mental math!  Students start with learning the Rounding Poem.  This poem helps them to remember the concept of rounding down for under 4 and rounding up for 5 and over.  Plus, the posters have clues to help them remember too!


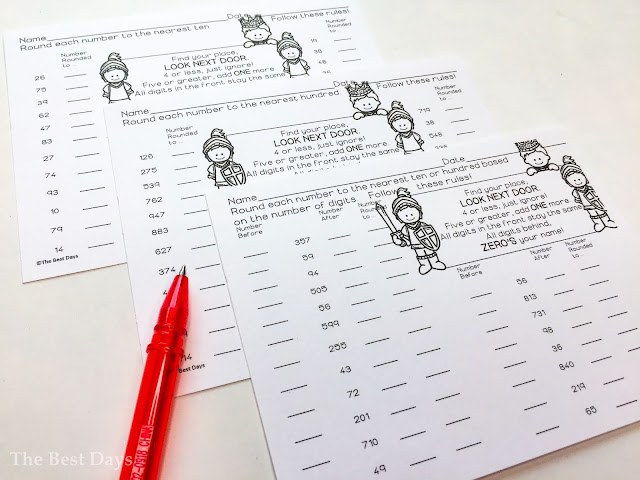
Students will first practice rounding to the nearest 10 and 100 by identifying the ten or hundred before and after the original number.  Then, students must decide, based on the rounding rules, which number it is rounding to.  This allows students to build the foundations of the mental math to come.  Next, student step into the mental math realm to round to the nearest number.  Both rounding to the nearest 10 and 100 is taught on separate pages.  

Once the skills are mastered individually, then students are presented with rounding to the nearest 10 OR 100 on one page!  This way, students can practice this skill in tandem with one another, switching their brains back and forth!  Plus, they can play a fun game! 


Rounding table practice pages

 This super fun game presents the students with the opportunity to defeat the Digits Dragon!  And, then, students can prove their mastery with a quiz!  


Digits Dragon Game


Best of all, then they are KNIGHTED!  Imagine their excitement to receive their official Knighthood after learning both rounding to the nearest 10 and 100 AND Medieval Knights!  It is just so exciting to them!  


Rounding Knight certificates


So, as you can see, rounding to the nearest 10 and 100 can be both a learning opportunity and fun!  And, everything you need can be found in this product!  Your students will love it and so will you!  I'd love to hear what you have to say or your ideas about rounding to the nearest 10 and 100! And, if you would like to learn more about what I do in my classroom, I'd love for you to join me on my Instagram journey and over at Facebook too!  


Pin for Later!
Pin for Rounding to 10s and 100s


June 20, 2019

How to Use Project Based Learning to Put on a Parade!

Have you ever wondered how you could easily add a Project Based Learning activity to your classroom?  Are you wondering how to put the project on display?   Sometime it can be merged as one!  Simply put on a Project Based Learning Parade!  


Float Parade Blog Post header


Where to Start?

First, pick a theme!  Every parade has a theme, so a Project Based Parade should have a theme!  Dive into your curriculum to see what could be developed into a project with the outcome as a float-because that's the point of a parade, great floats!  Here are two ideas:  

State Park Floats:  This project explored both the state in general and the region of the US it is found in.  It is primarily to learn about the 50 States.


State Park Float


National Park Floats:  This project explored both the National Park's history and the ecosystems found there.  It incorporated the food chain found in the National Park.  


National Park Project float


You see, both of these have a rich research base.  So, another piece of advice when diving into your curriculum is to look for something with a rich research base.  State flags, maps, park outlines, dates, ecosystems, tourist spots, etc. are all parts of the research base for this kind of project.   What topic are you studying that can allow for this rich base to be met?


Technology Integration

Next, you need to think about how much technology integration do you want?  Students can create research outcomes to accompany the float through the use of technology.  PowerPoints and other documentation can be help students to organize and present the information that they need beyond the actual parade float.  Consider this in your decision making process.

State Project


National Park Project


A post shared by Julie from The Best Days (@thebestdaysclassroom) on


Research Time

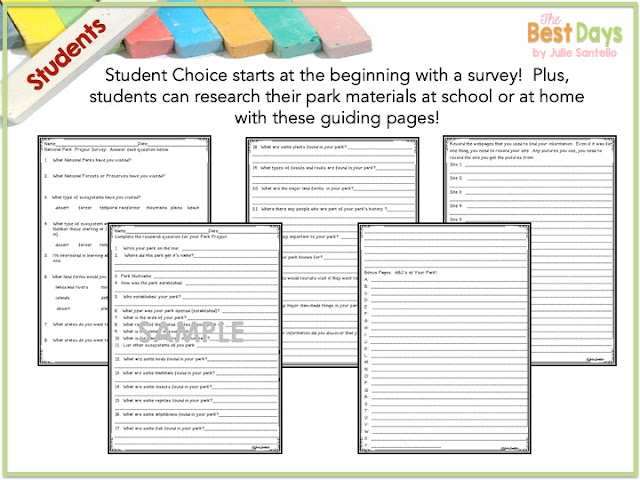
Questions about Research Time include how much of a guideline do you want to provide, how much time do students need, and do you want them to complete research in class or at home?  This will also determine your lesson plans and the development of your research questions.  This last point is key to where students go.  Scaffolding them in their research will help them to feel successful throughout the process, whether completed at home or at school! 


National Park Pages Preview of student work


Presentions

Next, you will want to think about how the presentations in class will be planned and what you will need for them.  Developing a rubric is SO important to this part-and the whole!  Research says that when teachers provide  a rubric, students can succeed at a greater rate.  Plus, it eliminates any negotiation for students who do not complete the task.  So, develop that rubric and get it into students hands!  


National Park Project Teacher pages


Once you are ready to present, have volunteers go first.  Students who are comfortable presenting will boost other's confidence and provide a foundation for others.  I try to pick students I know will offer great presentations so that others see and know what the expectations are.  This will often spur them into practicing more too!


The Parade

Finally, coordinate the parade beforehand!  This means you should send our emails to your staff to let them know the day and time you will be parading!  Students in other classes give the project builders the ooo's and ahh's that just make them feel successful!  Visit as many grade levels and classes as possible!  This means lots of eyes on their projects and a desire to make projects in the future!  That's a key to great project success!  


Once you have engaged in a Project Based Parade you will fall in love and want to do it every year!  Here are two projects to get you going - they provide everything you need for a great project parade!  


State Float Park Parade


National Park Float Parade Project


As always, I'd love to hear from you and what you like to do for Project Based Learning!  Drop a comment below or follow me over at Instagram or Facebook for classroom updates!  

Pin for Later:  


Float Parade Pin


September 6, 2016

Why I Wore an MTV T-shirt on a Tuesday!


Hurricane Hermine arrived in Florida on Wednesday, which then spurred the following chain of events, leading to the MTV T-shirt Tuesday!  Here’s how it went down!

On Thursday morning, my brain woke me up at 5:25, my normal time frame.  There was NO WAY I was getting up at that time, especially since we had no school to attend!  I was laying there, doing what teachers do-thinking about school and the things we were learning, when, out of no where, came the answer to a perplexing question that I have asked over and over again, “How do I REALLY get kids to understand the difference between primary and secondary sources?!”  Yes, I was really thinking about that, with a hurricane of rain hit my window.  I promise you, there is something about my brain in the morning that does amazing things!  I’m sure brain research is right!  I’m pretty sure it is because I cycle through the right sleep cycles and my brain has a chance to work on things at night because of it!  Anyways, back to my MTV T-shirt story! 

Once I actually got up, (8:30, just in case you were wondering) I set to work on a truly terrific idea.  The answer to my very question, “How to teach kids about primary and secondary sources?” was swirling around behind me as I sat at the table typing.   Rain, wind, craziness!  And from that, a FREEBIE was born!  The Primary and Secondary Source Project allows kids to see themselves as the very thing they are-a PRIMARY Source! 


Let’s take a look at how I did this with my students.  First, I decided to wear my MTV T-shirt to school.  I bought it because I can honestly say, I was sitting right there, in front of the TV, watching MTV being born!  I’m a PRIMARY SOURCE for that event.  I lived it.  I felt that the T-shirt, in all it’s glory, was a great way to get kids asking questions about why I would wear it, on a Tuesday of all days!  Next, I took the chance of connecting with my parents.  I sent out a quick email about taking a picture of their child or their neighborhood during the storm (looking out a window, etc.) and finding a newspaper article to print.  I also downloaded a number of local articles to have them handy for kids who didn’t get the task done. I found a simple article about MTV’s debut and printed that for my sample.   I also decided it would be fun to wear name badges that let others know that we are Primary Sources.  I purchased Avery printable name badges and made quick “Hello…I’m a PRIMARY SOURCE” tags.  Finally, I printed everything I needed to get the kids started right away on Tuesday morning! 


When the kids arrived, I got them started on their regular routine.  I decided I was going to switch up my schedule and put this activity first.  I wanted them fresh.  I explained to them that with the schedule change came a project about Hurricane Hermine.  I explained my MTV T-shirt and why I wore it.  Then I explained that they, too, were Primary Sources.  They were totally excited.  They wanted to share!  We got to work! 


Everyone had their own experiences and ideas about what took place based on the experience they had at home.  As we worked, we talked about what needed to be facts about the storm, real events that they saw.  We also talked about what could be based on emotions and ideas.  I did this step by step with them through my experience of watching MTV premiere (they were excited to hear that too!) 


The end result was magnificent!  And they get it now, they really get it now!  The best part, most work their “Hello” tags were worn home!   Now that’s a real impact if you can get a student to wear a “Hello” nametag home!   Success!!


So, here it is, in all its glory!  I hope you can use it in a variety of ways.  Just because your students didn’t experience Hermine doesn’t mean there aren’t great things they have witnessed!  Think about the Rio Olympics in itself-Michael Phelps, Usain Bolt, the USA Woman’s Gymnastics’ Team,  Simone  Manuel winning the first Olympic Gold for a black woman in swimming, and so much more outside of the Olympics.  The ideas are endless!  There are two levels of projects, so pick the one that would best work with your students! 

Let me know what your ideas are in the comments below!  I’d love to hear how you would use this in your classroom!  


December 31, 2014

Jumping Through TIme While Studying Then and Now in Social Studies

I’m going back to then, which was only about 10 days ago!  Yes, all the waaaaaaaay back to then!  Why, because I’ve procrastinated!  Yes, I have!  I’m really good at it too!  So, where did I leave off-oh, yes, then!  I’d like to step back in time to the fun we had in class learning about then and now!

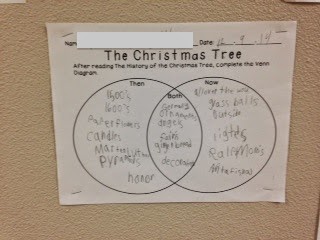
I actually have to go back to earlier in December first.  We had an awesome time learning about the history of the Christmas tree.  Remember I said I’d share a great idea I had for a hall display.  Here it is!  (Pin it for next year!) 


We started with a tree in the hall.  Nothing fancy.  In my packet I put some printable ornaments from then.  We started there.


 I then created some now ornaments (I will be updating the packet to include these for those who purchased it!)


This is our final product!  It came out AWESOME!  I got lots of complements from other teachers about how great it came out.  The kids loved looking at it too! The great thing about it was that the kids could use the tree as a visual to help them with their Venn diagram. 


They loved completing the time line also.  We’ve learned a lot about Queen Victoria because of this unit!  She’s responsible for many of the elements of our holiday (making it stylish!) including having a Christmas tree in the palace and sending Christmas cards!  Who knew!


Anyways, we had some real fun with ornaments too!  Here are two that we made with the St. Nicholas/Santa Fresh Read included in the packet.  They are great fun to make!

Hand Santa


Trace your hand with your thumb pointing out and your fingers together.

Glue the red paper across the thumb area.


Cut around the hand to create the hat.

Stretch a cotton ball out.

Put glue on the beard area. Glue the stretched out cotton ball there.

Take a second cotton ball and pull off a ball.  Then stretch the rest out. Put glue on the band and the end of the hat.

Glue the ball on the end.  Glue the stretched out cotton ball on the hat to form the band.

Punch a hole in the hat and add string.  Then they can hang!

Totally cute "now" Santas!

St. Nicholas Ornament


I found this on a Scandinavian site.  It is super simple.  A large triangle, a smaller triangle for the face/beard, and a medium triangle that is rounded for the hat! Super simple but a "then" ornament! 


Here's how they looked on our tree!


By far the best parts of our study included presentation of materials by our very own.  First, one of my students was able to share Hanukkah with us.  First we read the material and completed our learning.  During this time we used her as our primary resource.   The next day she brought in her book and talked specifically about what her family does.  The kids asked great questions and she shared great information!  It was AWESOME!


And, to celebrate in a different way than normal, our Christmas party was really Then and Now centers!  The kids had a real blast!!  It was so great!  My wonderful, former teacher, homeroom mom ran the station for quill pens!  Her sister-in-law works at Old Williamsburg and this is her actual job, to use quill pens and write tickets, etc.  My homeroom mom was given a set of quill pens and she dug them out of her stash to bring them in to use! The focus of the center was to learn to write like in the past, because they would write Christmas letters to friends. It was truly amazing to see the difference in kids’ handwriting.  Those that struggle to form letters with pencils did incredibly beautiful handwriting.  (What are we doing wrong today then!)  The kids worked diligently to create the letters and really loved this part of the first station. 
My AWESOME Homeroom Mom!


 I even had to try!  Big letters created splashing. You use sand to blot it up.  Small letters were easier and faster to form.  Cursive was much easier than print!

To complement this, we created modern day Christmas cards with stickers and glue! 


Our next center focused on a ball and stick game that was individual.  You had to catch the ball on the big end, the small end, or the stick in the middle.  Not an easy task!


While one player was doing this, the rest were playing holiday bingo!  Good stuff!


Our third station consisted of making an old-fashioned snowman clothespin.  The kids loved adding details to this one!


After they finished this, they created a modern plastic foam ornament with their picture on it! 

Our final center was trying out food from then and now.  For then, my homeroom mom cooked up some Wassail (spiced ciderish drink) in a crockpot right in class!  The kids were able to taste this drink and decide if they would like to drink this all the time!   Many said yes!  The other part of this center was to create a decorated cookie with sprinkles and the like!  Needless to say, it was one of their favorites! 


Overall, I’m really pleased with how great this unit is going.  I say going because I’m nowhere near finished!  I still have Jingle Bells and Skating close reads to go.  These are the most wintery to do after break.   I found this awesome video on Pintrest to go with Jingle Bells.  I think it will be a great way to introduce transportation in the past to my kids. It gets the point across well! 

I’ve also learned a few things about kids’ beliefs about "then".  They have no concept of how important fire was to people in the past-that they were not “kept” from it.  What I mean is that I’m sure they were afraid, it was something to be afraid of.  However, not like kids today.  They don’t understand that children handled fire, that it was used all day, every day, for many things.  The conversations about the candles on the tree alone were enlightening.  So, I’ll be creating something for fire too!  But, for now, I’m madly creating “The Sandy Day”, 


I'm going to the beach on Friday! 

a fun winter project for those of us who don’t have snow or anyone who would just like to have a fun compare and contrast unit for snow and sand!