Image Map

July 24, 2018

Reflecting on Open Seating in the Classroom

Last summer I explored Student-Led Learning in depth and pledge to reflect upon that practice-and I failed at it!  Miserably!  However, I did not fail upon the practice of this, including my pledge to try Open SeatingOpen Seating is different than Flexible Seating as it allows students to find their own seat in the classroom.  In best practice, it is done on a daily basis.  (Check this article out!)  Upon reflecting on open seating in the classroom, here's what I found worked for me.


Students sitting around a table working together with text that says Reflecting on Open Seating in the Classroom


What "Kind of" Worked!

First, I did try the idea of weekly moving of students.  That is the best I could do with this practice.  We never moved into the ability to do a daily change.  It was a huge investment in weekly changes when I was working on that practice.  I slowly moved into bi-weekly, which ended up becoming monthly.  I just could NOT put that much time into moving students around, not in this testing environment.  In addition to this, my administration became REALLY strict about bell-to-bell instruction.  That included on Friday.  We had our RtI invention at the end of the day, including Fridays.  I just could NOT fit everything in.  So, it became a monthly changing of seats.  

Second, we tried truly Open Seating.  It worked for a good amount of students.  However, as you would predict, there were "those" kids who just could not do it.  It was fewer than I thought it would be, which was surprising.  Students had to be reminded to try new friends, even with the idea of trying subjects, etc.  They tended to still want to migrate to their friends.  Or, carry on a pattern.  


Surprising Finds


Patterns-we soon discovered that certain students had patterns, including areas of the classroom that they wanted to sit in.  It was very hard for these students to want to be flexible.  At first, when kids found "their" spots, I allowed for them to stay in that location for more than one rotation.  But then they never wanted to move!  It became a need because as the year progressed, some of the other students needed to be separated.  Same problems as a regular class!  The thing I kept coming back to is that I wanted them to feel comfortable in a spot that they felt allowed for them the best opportunity to learn.  That was the hardest thing to balance.  

A square picture with two girls working together with the text Open Seating Building Partnerships

Partnerships-This was the most interesting discovery!  Students really do have the ability to find learning partners.  It quickly became apparent that this Open Seating opportunity allowed for partnerships to strengthen and grow.  Frequently, students began to sit together.  I began to watch these partnerships closely, to see if there was value within them.  There was!  I then gave permission for those partners to begin to stay together!  This was amazing, but came with some consequences.  Just like anything, this could wear on these kids.  They actually then knew that it was time to move apart-and WOULD!  Soon, these teams were back at it, working together although their seats were not.  AWESOME!  

Overall, I'd try Open Seating in my classroom again.  Students can and do monitor their choices.  They do determine where the best learning location in a room is. They do know when to give up friends and move to working partnerships.  Again, this applies to the vast majority of students.  Just like in anything, reflecting on open seating in the classroom is just as good for students as it is for the teacher!  

Let me know your thinking on Open Seating in the Classroom!  I'd love to know if you have tried it or you are willing to try it!  If you are, I have just the product to get you started!  Find it in my store!  In the meantime, drop your thoughts in the comments!  


A square cover for the Open Seating Product on TpT offered in this blog post.  It shows the posters and tents available for this product.


Pin it Later

Pin for Open Seating that is vertical and shows two girls working together, a table team of students and the text saying Reflecting on Open Seating in the Classroom.


July 20, 2018

How to Request Supplies You Need at Back-to-School Night (Or Open House!)

Do you spend a lot of time agonizing over how to request supplies you need during your Back to School Night or Open House?  Many teachers use lists to show parents what they need for  the learning that goes on in their classroom.  Have you ever thought to use a themed Giving Tree for this all important request list?  Here are a few ideas for your classroom donations!

Mom is loving watching daughter build at Back-to-School Nite so she is going to get some supplies for her teacher using the Giving Tree found on the board!


Easy to Use Design

These Giving Trees are totally easy to use!  Inside each of the Giving Trees you will find the letters to complete your display, the 8.5' x 11" poster that communicates the fact that you need to get those supplies for your classroom, and awesome frames for you to write your supplies on.  Everything you need!


This is a picture of how to layout the Giving Tree on a white board for Open House or Back-to-School Nite.


Displaying Your Giving Tree

These are super easy to display too!  All you need is a white board, a bulletin board, your classroom door, or a display board!  I've seen them done in all of these ways!  Here's how you put this together.

1.  Print out all of the materials you will need.
2.  Cut out the letters and other items.  You may want to laminate them because you can sue them year after year!
3.  Write your wish list items one at a time on each frame.
4.  Display your Giving Tree in your room!
5. Get those supplies!  Whoot!!

This is a close-up of a sample poster and a frame filled out for Open House or Back-to-School Night.


Things to Remember!

Think across your school year and subjects for your supply needs.  Think about those craft projects or those STEM activities that escape you right now! Holiday parties and events are another thing to think about!  Dig into your year and go from there!  

It is always key to thank parents for the supplies that they send in.  Simply sending a thank you note is one of the easiest ways to thank them.  One great way to show everyone what supplies were donated and say thank you all at once is to make a picture collage of all the goodies and send it out to all the parents at once!  It's a super fun way to show your thanks!

Themes!

There are so many themes available that you should find something that meets your needs!  If you don't see one here, I could probably whip one up for your needs!  Simply leave a comment or email me at classroombestdays@gmail.com to share your idea!  Here are the themes available in my store now!

                             This Camping Themed Giving Tree is perfect to get your supplies for Back-to-School Nite or Open House!       This Frog Themed Giving Tree is perfect to get your supplies for Back-to-School Nite or Open House!

     This Owl Themed Giving Tree is perfect to get your supplies for Back-to-School Nite or Open House!       This Pineapple  Themed Giving Tree is perfect to get your supplies for Back-to-School Nite or Open House!

This Space Themed Giving Tree is perfect to get your supplies for Back-to-School Nite or Open House!       This Sports Themed Giving Tree is perfect to get your supplies for Back-to-School Nite or Open House!

This Star Bright Themed Giving Tree is perfect to get your supplies for Back-to-School Nite or Open House!       This Bird Themed Giving Tree is perfect to get your supplies for Back-to-School Nite or Open House!

This Superhero Themed Giving Tree is perfect to get your supplies for Back-to-School Nite or Open House!       This Racing Themed Giving Tree is perfect to get your supplies for Back-to-School Nite or Open House!


As you can see, using Giving Trees to request supplies you need at Back-to-School Night or Open House can be a simple and fun process.  I'd love to see you try one out!  Drop a comment if you have other ideas of how to ask for supplies!  We'd love your suggestions!

Want to discover more about how to make your classroom more student-led during the first week of school?  Check out this blog post!


Pin for Later

This pin shows the different giving trees available for Open House or Back-to-School!


July 18, 2018

How to Hack the Dreaded Teacher Observation Rubric to Save You Time

Teacher teaching class with girl smiling because she helped the teacher Hack the Dreaded Teacher Observation Rubric

Each year as teacher observations come around, everyone starts to panic!  One of the panics include:


"How in the WORLD am I going to get my student created rubric done for the lesson they are going to see!"

Yep!  Every. Single. Time!!  After my first year of getting "dinged" I realized that it can't just be for this observation, this moment. What are we really doing in our classrooms that things like this are only good enough for observation moments?  Do we not realize YET that kids aren't going to play into that kind of thing and that administrators (or, at least, let's hope) get that the kids have no idea what they are using that rubric for!  The fact is, every classroom should be creating rubrics with students and for students! But, we struggle with allowing them to create, to impact their learning and, in all of this, make our rubric rock for our observations!  I think I have found the PERFECT Teacher Observation Rubric Hack!  


How to Hack your Teacher Observation Rubric


First, determine what your end results for your observation needs to be.  This is what they students will be learning in the lesson that you are going to be teaching.  You want this to be fresh and new-nothing they have totally mastered.  If they have some ideas, that's ok.  My admin looked at my finished rubric and specifically asked if the students gave those outcomes.  I was able to say no!  That was a good thing.  My admin said that if they were able to give the outcomes in 4 levels, there was zero reason to do the lesson!  So, keep that little tidbit in mind as you are planning your observation!  

Next, create an anchor chart with the titles.  I simply headed it STEM and added a column for "Behaviors" and one for "Scientific Knowledge."  Your second column will be your curriculum focus.  You can even change your behaviors column to something like, "Grammar Elements" or "Center Work"-anything you need for your lesson!  Get creative!  


A  boy working on adding his post-it note to the Teacher Observation Rubric Hack chart in class.

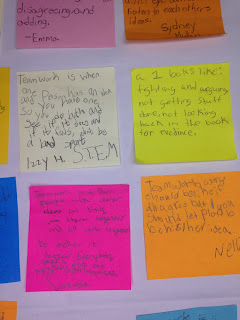
Now comes the magic!  Gather your students to your carpet or meeting spot!  Explain that your administration will be coming into your classroom to record the story of your class.  I take this route because our administration talks to the students and writes things down.  This totally scared my kids the first time they did this because they have little to no contact with administration.  By explaining that they are writing a narrative piece, they are ok when they see their names being written down on the paper or computer they are using.  I tell them to be open to the story and to add whatever they can to make our classroom story be the best!  Next, I  introduced the chart.  My students knew that we would be observed and what we would be doing.  I shared this again with them and then asked them to think of other times we have worked through an activity like this!  We worked first on the behavior side.  I had them turn and talk about what behaviors they felt were key to this activity.  Then, here's the magic, I had them record information for behaviors with the idea that 4 was the best work and 1 was the lowest performing behaviors.  They could write to whatever they felt they know the most about!  All it take is one student's ideas to make this work, so don't stress that they are all perfect statements!  
Now, do this again with "general" knowledge of your topic.  Remember, you are not looking for them to nail it!  You want them to be general so you can adapt it, etc. to your needs!  You get to nail it!  
These are post-it note examples of how the students replied to the questions on the chart for the Teacher Observation Hack Rubric.


Whats Next?

Now, pull that chart off just as it is, take it home or someplace quiet, and get to work!  Here's what you do!  
1.  Set up a table in PowerPoint or some other document that will allow you to create the rubric.  You could also create it on another sheet of paper for display.
2.  Look for great quotes from students that you can adapt to the positive just enough to make your rubric work! 
3.  Look for levels of learning expectations (See the level 1 in that pic!)  
4. Create the teacher observation rubric from the students' statements and ADD THEIR NAME where their statement connects on the rubric!  Yep, nothing causes ownership like their names on a rubric!  
5.  You add the content specifics and add names only where needed.  Notice on mine, it is only at Level 1 because they actually targeted their struggles in this statement.  That came out during my observation!  


This is a rectangular page that shows the rubric information with students' names added to Hack my Teacher Observation Rubric.


Easy-peasy!  And, you have a beautifully designed teacher observation rubric with student-led learning wrapped inside!  This took me considerably less time than the rubric I made the year before.  That one took me DAYS of class time, because we had to do it in small doses!  This one was quick and easy!  Students loved their names on it and many were impressed that they even had the thoughts they did!  The only thing we did in addition to these steps was to share the actual content of the rubric the day before the observation.  Students also had a copy in their STEM folders and I was able to refer to it and remind them of their scoring criteria throughout the observation!  All in 1/2 the time of the previous rubric development in my classroom!  

How about you?  Have you developed an easy way to create a student-led observation rubric?  If so, I'd love to hear all about it!  Drop a comment and let us know!  


The product I used for my observation is available in my TpT Store!  
This is the Star STEM link to TpT I used during my observation and to hack my Teacher Observation Rubric

Want to read more about my ideas on the Teacher Observation System?  Check out this post!  

Pin for Later:  


Teacher teaching class with girl smiling because she helped the teacher Hack the Dreaded Teacher Observation Rubric


May 4, 2018

The Force Was With Us on May the 4th!!


This year's celebration DID NOT disappoint!  Each year I try and celebrate International Star Wars Day, which is on May the 4th!  I know this is my "thing", since I've been a Star Wars girl all my life!  I'm happy to say I am a member of the Class of 77'.  This has nothing to do with high school.  This, in Star Wars land, means that I was actually there, in 1977, to see the movie!  It was so fabulous, my mother let us all see it TWICE!  This was a BIG deal in the 70's, as no one could really afford to see a movie twice!  However, there is so much you can actually do that even if you are just familiar with Star Wars, you could run a successful day!  

Everyone needs some Star Wars in their life-a mug, a shirt, and some fun friends!! 

Let's Get Started!  


First, this was the PERFECT time for me to throw in a celebration for ending the FSA, Florida's version of State Testing!  My kids were totally wiped out after two days of testing.  So, today's celebration offered a wonderful chance to decompress and do something fun!  So, we started with a fun math that was easy yet worthy of a grade!  Check out what we did here!  This math idea would be one of the easiest ways that you can include this celebration into your classroom!  

Another great way to include this celebration into your classroom would be to add a touch of art!  This year, we added Symmetrical Aliens to our activities!  These are super simple to do and can be done with almost any theme!  Simply fold a piece of paper in half and have students draw 1/2 of their alien ON THE FOLD!  Once they finish, have them trace this design in crayon.  


Next, fold their alien into the inside of the paper and rub this line with a pencil on it's side.  They need to rub HARD!  Once you are done rubbing, open it up again. 


You will have a very light line.  Trace over it, and, you have a perfectly symmetrical alien!  Add any other details and color it in!  


These came out so great!  

Again, I kept with the tradition of letting the Wookie Win! This game is so fun and plays like a Jeopardy game.   It would be super easy to create because I can't share this one due to trademark issues.  The questions focus on review and you could even play this game without the fancy PowerPoint!  Just think of some fun questions from each category that you teach and go for it! 


It isn't a Star Wars celebration unless you have an tasty treat!  This year I went with TIE-fighters and Wookie Cookies!  Both of these were super simple!  Each child needs some Oreos or other cookies, a marshmallow, and some frosting!  They just put the frosting on the marshmallow and add the Oreos on the end!  Yum!  Our new treat was Wookie Cookies!  I put some chocolate frosting in a ziplock and cut a very small hole in the tip.  The kids used this to put the frosting on a chocolate chip cookie!  Then they added some edible eyes!  So cute and tasty too!  


It was a totally fun day and a truly great way to celebrate our success at the end of testing!  I hope you enjoyed International Star Wars Day and, if you have never celebrated, I hope it inspires you to try your own celebration!  Let me know what you do, too, in the comments!  And, May the 4th Be With You!  

Pin for Later!  


February 12, 2018

Sending You Love $100 TpT Gift Card Giveaway

Every now and again I share a great giveaway!  This one is one of those!  I've paired up with 10 Teacher/Authors to #SendYoutheLove!  


We are super excited to give you a chance to win a $100 gift card to TpT!  With the sale starting on Wednesday, February 14th, this would be an awesome way to purchase what you need for your classroom!  Join the fun by entering the Rafflecopter below!  


a Rafflecopter giveaway


The winner will be announced on Wednesday, February 14th!  So, check back to find out who wins.  

*This contest is not sponsored by Blogger or TpT.  Winners will receive 10 gift card codes to use on TpT!  


January 30, 2018

5 Steps to Creating a Great Anchor Chart WITH Students


This may be an unpopular view, but I'm anti pre-made anchor charts.  With all the Pinterest charts and materials flying around out there, teachers have begun to loose that one thing that matters-the STUDENTS!  We have the shabby chic classroom that means nothing to students.  We have the Pinterestly perfect accessories and the ultra deluxe bookshelves that make everything Southern Living perfect.  Including our anchor charts.  Anchor charts-a tool to teach children.  A tool for children to use.  A tool that is interactive.  A tool 100% designed to be done with children, in front of children, and have meaning to that child because THEY had the learning presented to them in a way that makes sense.  Anchor chart-NOT a poster made at home by a teacher to make sure their class is Pinterestingly Perfect!  

However, even I recognize the need for a great looking anchor chart every now and again. In the age of the Pinterestingly Perfect anchor chart, there has to be a happy medium.  I also get the main goal of time saving.  However, what I don't agree with is the idea that students are presented the information in poster format and having that called an anchor chart.  So, is there a way to combine them into one.  I think so!  

Step 1

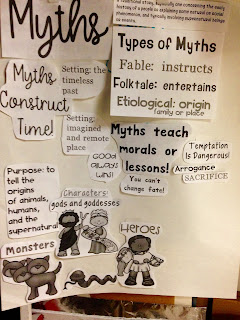
Determine what you want your anchor chart topic to be.  In this case, I was introducing myths to my students.  I wanted to present the facts behind myths to my students.  I started with a large header and went from there.  I had researched the elements of the myth and knew what I wanted the chart to hold. Then I went to designing.  I designed these.  

Step 2

Next, I created a mock-up.  I printed my design in black and white so that I could see how it would fit on the chart paper.  I laid it out with the end in mind-making sure it all fits!  

Step 3

Next I printed the pieces in color and cut them out.  I also clipped them together in the order that I wanted to introduce them to the students.  This way, I was ready and organized for the lesson sharing the elements of the myth.  


Step 4

Present the lesson.  At this point, glue is your best friend.  I kept a picture of the mock-up on my phone so that I always knew what was coming next.  I glued and discussed with the students as we went.  They had lots of questions for each part as we worked, instead of seeing everything at once.  I would have totally lost them the whole lesson with those monsters if I had presented this chart all at once!  They were fascinated with them both!  


These materials will soon be available in my TpT store!

What we ended up with was a great looking Anchor chart that was teacher driven but completed in front of the students.  The students interacted with the material and learned it in a sequence that did not overwhelm them all at once.  Our discussions about each part allowed for the building of the knowledge they needed but, yet, did not give it to them all at once!  

Anyone can develop charts like this.  All you need are some great fonts, some great clipart, and a little bit of time to think it through and type it up-just like any anchor chart you would make without students present.  The difference is, students are present and part of the development when done this way, which deepens their learning!  

I hope this helps you think about how you develop anchor charts with students.  I'd love to hear what you have to say!  Let me know in the comments below!  

This come from my King Midas and The Golden Touch product!  


Pin for Later


January 23, 2018

February Writing Fun: Great Products to Get You through February


Whether you have primary or intermediate students, I know the month of February is packed-each with it's own fun, problems, and issues to cover.  Writing shouldn't be one of them!  I've got you covered!  As you know, I've been talking a lot about writing in my classroom lately.  I've given up the boxed programs for a more "old school" approach-actually TEACHING in CONTEXT!  Imagine that!  Anyways, now that January is heading out the door, I want to cover some of the things I plan to do for February.  Here we go!


Today I am double posting!  I'm over at Conversations From The Classroom talking about how to have fun with STEM and writing through the use of one of my products called Love Bug in a Jar   This has always been one of my favorite prompts to write about and I'm sure this year's group won't disappoint!  Check out what I'm sharing if you love this idea-I think you will!

Check it out here!


If that doesn't fit your needs, I have two other great products for Valentines that just might.  Both focus on Valentines but are geared toward text dependent writing prompts.  These are designed to provide practice for your students in the area of reading prompts and, then, having to write with source materials in their pieces.  These are print and go ready too!  One of the things I've done in the past to help cut the copy costs is print the reading pieces on card stock and then laminate them.  This way I can use them over and over again!

            
Click on the pictures to view these products.  

How about Groundhog's Day!  I've got you covered! This great narrative piece will let kids think about how the groundhog would feel being awaken from a sound sleep to be jolted out into the cold world to see what the weather would be for the next six weeks! Is it me or have you ever really thought about the inaccuracy of that!  The sun has to be out for the groundhog to see his shadow!  Wouldn't that mean spring is on it's way and not more winter!  But, it's a fun tradition and that groundhog lives high on the hog-pun intended!

Check it out here


Right after Valentine's Day, we head into President's Day!  Students would just LOVE writing about a day with any President of their choice.  This can be simply a narrative piece, or, for added bonus, use this document to do some research about a President.  Then, students can use that research to create their day with a President!  How fun is that!

Check this one out here


As February winds up, intermediate students would love to explore the history of snow globes!  Students are provided with three pieces to read and examine.  Once they gather vocabulary, notes, and ideas about the history of the snow globe, students write about their new knowledge.  Then, they get to try their hand at creating their own snow globes!  This was is so, so much fun!

You can find this fun project here! 

Don't forget that the Winter Games are coming!  This product has a little of everything!  Students can do a quick research piece on one of the sports they are interested in.  Once the mini-research is completed, they craft an informative essay as to why that sport is their favorite!  Then, students create a topper to match their choice!  These would look great in anyone's hallway or classroom!  

Find this fun product here!


So, as you can see, I've got you covered for the month of February in writing!  Find them all at my store on TpT!

Pin for Later!


January 16, 2018

The Best Way to Build Writers: Modeling, Planning Style!


As I travel through this journey of giving up the boxed writing program, there is one thing I will never give up-MODELING!  Teachers frequently ask me what makes my students become the writers that they are, and that's what I tell them-MODELING!  You have heard it over and over from others I'm sure, but I'm here to tell you, modeling is golden!  It is the very key to successful student writers, with one other thing!

Modeling!  


Where does this process start-at the very beginning.  I model how to make a plan first.  This is so incredibly important!  Students need a plan to guide their writing, but it is the first thing that teachers drop.  WHY?!  I have heard everything- students don't know what to do, they don't use their plan, it takes too much time, it's too hard!  UGH!  This is NOT about us, the teacher!  It is about students making their way in writing, with a view of where they are going in their sight!  Give them the opportunity to have success through planning.

So, how do you model this?  Super simple!  The first thing you need to do is decide on what form of planner you want to use.  I am a Hamburger Planner girl myself!


I have used this planner for years with every grade from first through fourth!  I find the idea to be very appealing to students and it is easy to make the parts valuable to students.  The buns go together-this is a MUST!  Students must understand that the top bun and the bottom bun are THE SAME THING!  The focus of the writing goes in each bun.  Where do you get the focus-from the prompt, the assigned topic, or their own personal choice of topic.  That's the joy of the hamburger planner!  You can use it for all styles of writing and for any topic!  Just a little tweaking to make it work across all the platforms and you're good to go!

Next, students will move into the hamburger layers.  This is where you can talk about all kinds of organizational issues.  This is where organization starts after all!  That's one of the very reasons to plan!!  Instead of students jumping all over as the write,  this can be fixed before they write!  Take the time to talk about this during the planning stage.  Then, MODEL it!  Get a copy for yourself and fill it out.  You are going to be using this to guide your way, so fill it out before the students, not before class!  Modeling only works well live.  Give up your idea that it has to be fancy and beautiful because that isn't going to work.  Talk through your thoughts and the why behind what you are writing on the page.  The more you verbalize, the more students will see that you believe in what you are doing-and that means it WORKS!

You see, that's half the problem right there.  When we offer students criteria and then don't support it with evidence, we are doing the same thing they are when they don't use text evidence.  "It was in my brain." doesn't work when we want them to provide text evidence,  so why would we want that for writing!  Model this step and it will pay off BIG TIME!


An now, for the next best thing to Build Writers-Have honest conversations about what is on the planner.  Yes, that's right.  Ask kids to share and then have an honest conversation about what is on their page.  The key is to wrap it in that general rule of  one positive comment, one suggestion, and one positive comment so that kids are seeing your suggestions as a positive.  Here's a brief example of how this might work:

Conversations

Student: My bun is Winter Break.  My reason one is Isle Maurada, my reason number two is Disney Cruise, my reason number three is running a race.  My final bun is Winter Break.
Teacher:  I love that you are focusing on your favorite thing on your break, which is your Disney Cruise.  Do you think that your order of these reasons makes sense in the order they are in?  Think like a story from a book.  You're ideas are strong.  What can you do to make it make better sense?
Student:  I could put the Cruise first!!

Yep-that was a real conversation.  By simply allow students to take a minute to think about their planner fixed a major writing problem-organization-BEFORE their draft was written.


I hope this helps you to build confidence in planning and using this as a modeling tool.  Take the time to try it, and stick to that planner for writing.   I'll be back to discuss this very thing, so you can see the sequence of how to model with the planner during the writing process.  Until then, let me know what you think, what your favorite planner is, or any ideas that you might have for modeling writing with students.  I'd love to hear from you in the comments!


Pin for Later!