

This may be an unpopular view, but I'm anti pre-made anchor charts. With all the Pinterest charts and materials flying around out there, teachers have begun to loose that one thing that matters-the STUDENTS! We have the shabby chic classroom that means nothing to students. We have the Pinterestly perfect accessories and the ultra deluxe bookshelves that make everything Southern Living perfect. Including our anchor charts. Anchor charts-a tool to teach children. A tool for children to use. A tool that is interactive. A tool 100% designed to be done with children, in front of children, and have meaning to that child because THEY had the learning presented to them in a way that makes sense. Anchor chart-NOT a poster made at home by a teacher to make sure their class is Pinterestingly Perfect!
However, even I recognize the need for a great looking anchor chart every now and again. In the age of the Pinterestingly Perfect anchor chart, there has to be a happy medium. I also get the main goal of time saving. However, what I don't agree with is the idea that students are presented the information in poster format and having that called an anchor chart. So, is there a way to combine them into one. I think so!
Step 1
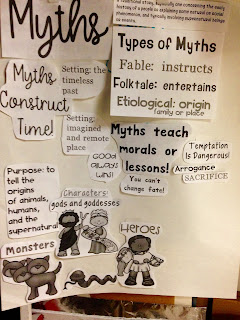
Determine what you want your anchor chart topic to be. In this case, I was introducing myths to my students. I wanted to present the facts behind myths to my students. I started with a large header and went from there. I had researched the elements of the myth and knew what I wanted the chart to hold. Then I went to designing. I designed these.
Step 2
Next, I created a mock-up. I printed my design in black and white so that I could see how it would fit on the chart paper. I laid it out with the end in mind-making sure it all fits!
Step 3
Next I printed the pieces in color and cut them out. I also clipped them together in the order that I wanted to introduce them to the students. This way, I was ready and organized for the lesson sharing the elements of the myth.

Step 4
Present the lesson. At this point, glue is your best friend. I kept a picture of the mock-up on my phone so that I always knew what was coming next. I glued and discussed with the students as we went. They had lots of questions for each part as we worked, instead of seeing everything at once. I would have totally lost them the whole lesson with those monsters if I had presented this chart all at once! They were fascinated with them both!

These materials will soon be available in my TpT store!
What we ended up with was a great looking Anchor chart that was teacher driven but completed in front of the students. The students interacted with the material and learned it in a sequence that did not overwhelm them all at once. Our discussions about each part allowed for the building of the knowledge they needed but, yet, did not give it to them all at once!
Anyone can develop charts like this. All you need are some great fonts, some great clipart, and a little bit of time to think it through and type it up-just like any anchor chart you would make without students present. The difference is, students are present and part of the development when done this way, which deepens their learning!
I hope this helps you think about how you develop anchor charts with students. I'd love to hear what you have to say! Let me know in the comments below!
This come from my King Midas and The Golden Touch product!

Pin for Later

No comments:
Post a Comment