Image Map

November 11, 2014

Science: What If?

      
My Super Scientist Posters cut apart and used as headers!

      This year when I looked at what I was supposed to teach for the Nature of Science and thought the same thought, “REALLY!  They ask us to teach this stuff and give us NOTHING, EVER!  How in the world am I going to teach this?  Where am I going to get all this stuff?”  Now, I know this is exactly what most teachers think.  It’s true!  We are asked to teach and then not given the materials that help us to actually complete the tasks, especially in Science.  And then we think about that person on campus who usually has the stuff!  We think, “Well, I bet THAT person could teach all this and have all the supplies!”  And, suddenly, I realized I was one of the three people on my campus that they would think of!  That stopped me dead in my tracks-ME!  They would think of ME!  So, what’s my excuse at that point?  I had to adjust my thinking.  I had to eliminate my excuse.  I had to think, “What if?”  What if I taught this with the tools?  What if I did it in a creative way?  What if I created my own Science Notebook?  What if it WORKED?  And that was my new “What if” ….create a tool that uses as many pieces of science equipment as possible, teach the tools, make it fun for kids, and make it realistic with supplies that are on campus or in a grocery store!  And with that, ToolsScientists Use:  A Notebook for Little Scientists was born!


The notebook was just a portion of the whole package!  Students were able to record information about the experiments in their booklet.  It was an easy access point for each lesson and did guide our work.  Here are some of the activities, through pictures, that are in the notebook! 

First, they design what their notebook would look like.  We read a book and discussed the different types of scientists.  Then they designed their cover.


Measuring tools came up first!  I didn't even know I had these tools in my closet till I put them all together in one location!!


The first measuring activity involves measuring each other to discover how a tape measure works.


The second measuring activity deals with weight and balances!


There is one dream in the childhood science experiences that every kid has-to wear goggles!  And, here they are doing it!  


Dancing Raisins!


 Sadly, we used an online source for the microscope!  I couldn't get any slides to work!  I think I need my eyes checked!!


The last day we completed the Test Tube observation!


They were very excited!


The results as they were "developing", literally!  The next day they were even better!

And, there's more than just what you see here!  Droppers, thermometers, and some others.  Sadly, I had to reset my phone (due to my poor memory!) and lost those shots.

I was very amazed at how the kids really loved what we did!  They looked forward to it each and every day, no matter what the results were!  Their notebooks were great, and we did have to work at a number of the skills!  But here’s the best part!  The assessment!  I created this craftivity to assess the students according to what they learned. 
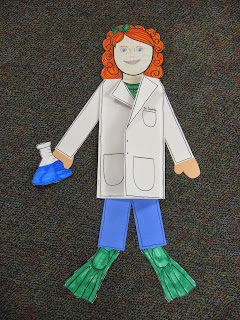


         Each side of the coat represents what they learned.  One side says "This is What I Know about Scientists".  The other side says "This is What I Know about Scientist's Tools".   This is what the whole point of our learning was about!  Could they explain the tools, could they explain what scientists do?  There has to be more than, “You did these great experiments, you’re good!”  I think this is the key to what this whole unit needs!  But let me go on before I go on!! 

     In the middle of the scientist is an experiment developed by the student.  This was something my district put in our road maps.  Here’s how I tackled it!  Each Friday, I have Book Buddies with an fourth grade class.  These students have also studied tools and the scientific method.  This was the perfect opportunity to have that extra hand for my students that was needed to make this self-developed experiment a reality.  The 4th graders worked with my first grader to come up with an idea.  Then they helped the first grader record all of the information they could onto their experiment paper.   This was the first Friday of work.  

     On the second Friday, I had all of the tools available for the students to use.  The team of kids conducted the experiment together and recorded the results!  This was a great way to complete this difficult  task for an individual teacher to do.  My kids learned a lot, the 4th graders had a chance to reciprocal teach, and I could assess the kids successfully on what they completed. 

     Now, let’s go “there”!  Many times I thought assessing this type of unit was done through the assignments themselves.  I didn’t have the gumption or the time to do what the assessors asked for.  So, here’s the “What if” to come back to the beginning-What if we did assess this “stuff”?  Here’s what I discovered.  Although students knew the tool as they were working with it, they had a hard time communicating what the tool really did and what they learned.  Students still couldn’t explain what scientists did, even though we discussed it each day and we worked at it through the experiments.  What does this REALLY mean?   We aren’t doing enough, especially at the early ages, to get this information across.  Would I change what I did-never!  Does it have me thinking for the rest of the year?  Yes!!!  So, is teaching and assessing this information worth it-YES!!!  It should raise a variety of questions for you, teaching directions to follow, experiments to develop!  This shows me that EVERY unit needs the exploration of experiments and EVERY unit is worth the time to take to do this!  


     And, as just a reminder, I was one of the 3 people on my site that people would think about for using the tools.  So, where did I get them?  I borrowed from the other two!  I don’t know a science-based teacher who won’t lend out materials, so hit them up!  Also, if you need upper grade kids for help, ASK!  This could be a grade for them as well, as their teacher monitors what they are doing and their mastery of the scientific process! 

     I’m hoping this raised some thinking for you, because it did for me!  What kinds of questions do you have about science and the topics discussed here?


September 5, 2014

Classroom Reveal 2014 (Otherwise Known as I HATE Moving!)


Can I just tell you how much I HATE moving rooms!  At the rate I have moved, I should be an expert, but I’m not.  In my building, when you change grades, you move rooms.  Most of us are lucky enough to be able to stay in one spot, and I’m NOT one of those few. I have moved to 5 rooms in 10 years at my school, with the longest (and most favorite room) being 4 years.  It’s not the grade change that kills me, it’s this: 

The majority of my stuff!


My book shelves (loaded with books that we moved) and my paper station.


Most of my math supplies and some of my holiday decor.  


Yes, that is 21 years of crazy teacher stuff spread out all over my new room!  It only took us a morning to move everything because I was lucky enough to pack most of it the last few days of school.  I decided to put my units into plastic bins (which are in there somewhere) and that helped me a lot, especially on space.  I moved from the biggest closet in the building-it was big, like park an SUV in it big- to one of the smallest:

(this is tiny for our building) which was a whole different challenge for me!  That meant clean it out and pack it tight.  It took me 5 days to get this stuff put away (and a whole lot of Advil too!)  But I got er’ done!

Since I was moving grade levels, I also decided to change themes. That was the fun part.  Once the junk-um, I mean, teaching supplies-were put away, I started to decorate.  As I decorated, I loved the room more.  As I loved the room more, I began to “feel” the space and organize more and more.  So, here it is!  The “official” Room Reveal!  I’m loving it, and so are the kids!  


(Most of the Superhero products are from Susan Morrow)

The outside of my room!


And the inside.....

My meeting spot!


The calendar area.


This is what I face when I am sitting in my chair.  


Cute Cubby Numbers by Susan Morrow!


To the left of the cubbies is my desk. I don't really like this huge desk, but it is hiding A LOT!


My word wall!


My library with the computers behind it.  You can see the white monitors poking above the far books.  And, notice the fan.  It is a warmer classroom, so we need the circulation!  This week I had kids put some sweaters on, so that's a good sign!


The view across my room from the Word Wall area.


Great table signs by Susan Morrow


Birthday signs waiting for student's birthdays!


How We Get Home signs - freebie from a TpT Store.


Job Chart from Susan Morrow.  I made the star burst with Power Point.  


The board was all ready for Back - To - School Nite!  
Find Super Hero Giving Tree HERE! You can also see a peek of my rules, which are free HERE!


Super Hero Scientists!  Find them HERE!

This is also a product from another TpT seller.  It is editable and easy to use.
All ready for parents to take home a use to learn about our classroom!


Here are my essential question frames that I used in my other classroom.  What I did was create superhero pages to put inside! They work great!  You can download these for free HERE and HERE!

So, as you can see, I kept many of the elements that I created and used in my former room!  

Here's another look from the teacher desk looking forward. 


I have to admit, this was three weeks ago, so there are kids, messes, papers, crayons, markers and messy book shelves, but that's what makes it our space! I do like this room, and I'm coming to love it!  I just have to work on that closet space! 

And, so, with that, I leave you to enjoy your school year.  Let me know what you think and what you are doing in your classroom.  I'd love to hear about it!


August 25, 2014

I Made It Monday!


Today starts the 2nd week of school for me, and, as I intended, I am writing a blog post.  However, it is NOT the topic I meant it to be.  This post was supposed to be about my classroom theme, not what I did all summer!  But, alas, I left my phone at school with ALL the pictures on it that I needed to make the post work!  So, instead, you get "I MADE IT MONDAY"! 
Lots of bloggers share "Made it Monday", showing off all the goodies they made for their classrooms throughout the summer.   I’ve decided to show you what I made to wear in my classroom for the school year!  This summer I rediscovered the seamstress inside of me!  I must say, it was like having therapy!  And, I look great to boot!  That’s a win win!
Here’s how it started.  I was in our local Walmart ALONE and decided to go down the newly reinstated material and pattern isle!  I started looking through the pattern book and, to my surprise, was amazed by the very stylish  patterns that we in it!  One of the reasons I stopped sewing was because the patterns were not keeping up with the fashions of the time!  These new patterns were awesome!  It just so happens that the next day I was speaking to my mother.  I asked where the closest JoAnn’s was, and she informed me that it was out in the community I worked in.  The very next day, a Monday, my son started his summer session at his school –in that community!  It was lining up perfectly!  I hit JoAnn’s and came home with material to make two skirts and a shirt.  That very afternoon, skirt number one was made, and the rest is history!  So, without further delay, here we go!


This picture comes first because it is what I wore today!  I had my son take some shots of me in the back yard.  It is McCall’s # M6706 (skirt) and #M6708 (jacket).  The red shirt is store bought.  It was very fun to wear, but the skirt took a while to sew. Lots of straight LONG lines!  I got lots of compliments on it!


These are two of the skirts I made with New Look pattern #6899.  The brown one is the first skirt I made this summer. The other is rigged in so many ways that it made me realize sewing is like riding a bike! (The pattern lies about how much you need, so I had to add some fabric here and there to make it work!)


This is the shirt from the same New Look pattern (#6899) and a skirt to go with it.  I’m not thrilled with the shirt, as it is a little large for me.  But the orange sweater I have will go with it and cover it up enough that I will be fine.


This is the first dress I made.  McCall’s patterns were on sale that first week.  I really love this dress.  It is fun and I love the pockets.  It was actually very easy too! McCall's M6506 with a smaller collar.  I actually took a lot off of it!


This skirt is a fun pattern but it lies. (McCall’s pattern #5430)  It says “one hour skirt!”  It took me six hours between the pressing, the sewing, and adding a self-slip! But, I love it!  


This is just a fun picture of the other dress I made, McCall’s M6503 .  On Friday night my Church’s youth group had a scavenger hunt based on Where’s Waldo!  I was the Pink Shopping Lady!  I added the boa and hat just for the event!  This is the dress I wore the first day of school as well.  It is cool and pretty at the same time!  In this heat, it is a plus! 

I did make a pair of pants, which, honestly, are in the wash right now!  They aren’t my favorite, but they work with a long shirt!  I have 3 more dresses to make (I’m hoping to make one over this long weekend coming up) and a skirt as well.  I did get material and a pattern for a winter jacket.  I need to pick out lining and hope for weather cool enough here in Florida to be able to wear it.  We usually get some cold fronts that are worthy of a good winter coat! 

That’s may fashion show for Make It Monday!  Now, if I could just remember my phone, I can post what my classroom looks like this year!