Image Map

December 31, 2014

Jumping Through TIme While Studying Then and Now in Social Studies

I’m going back to then, which was only about 10 days ago!  Yes, all the waaaaaaaay back to then!  Why, because I’ve procrastinated!  Yes, I have!  I’m really good at it too!  So, where did I leave off-oh, yes, then!  I’d like to step back in time to the fun we had in class learning about then and now!

I actually have to go back to earlier in December first.  We had an awesome time learning about the history of the Christmas tree.  Remember I said I’d share a great idea I had for a hall display.  Here it is!  (Pin it for next year!) 


We started with a tree in the hall.  Nothing fancy.  In my packet I put some printable ornaments from then.  We started there.


 I then created some now ornaments (I will be updating the packet to include these for those who purchased it!)


This is our final product!  It came out AWESOME!  I got lots of complements from other teachers about how great it came out.  The kids loved looking at it too! The great thing about it was that the kids could use the tree as a visual to help them with their Venn diagram. 


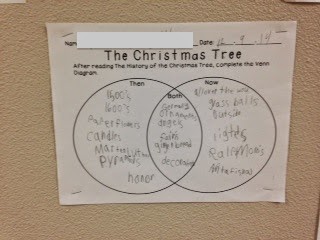
They loved completing the time line also.  We’ve learned a lot about Queen Victoria because of this unit!  She’s responsible for many of the elements of our holiday (making it stylish!) including having a Christmas tree in the palace and sending Christmas cards!  Who knew!


Anyways, we had some real fun with ornaments too!  Here are two that we made with the St. Nicholas/Santa Fresh Read included in the packet.  They are great fun to make!

Hand Santa


Trace your hand with your thumb pointing out and your fingers together.

Glue the red paper across the thumb area.


Cut around the hand to create the hat.

Stretch a cotton ball out.

Put glue on the beard area. Glue the stretched out cotton ball there.

Take a second cotton ball and pull off a ball.  Then stretch the rest out. Put glue on the band and the end of the hat.

Glue the ball on the end.  Glue the stretched out cotton ball on the hat to form the band.

Punch a hole in the hat and add string.  Then they can hang!

Totally cute "now" Santas!

St. Nicholas Ornament


I found this on a Scandinavian site.  It is super simple.  A large triangle, a smaller triangle for the face/beard, and a medium triangle that is rounded for the hat! Super simple but a "then" ornament! 


Here's how they looked on our tree!


By far the best parts of our study included presentation of materials by our very own.  First, one of my students was able to share Hanukkah with us.  First we read the material and completed our learning.  During this time we used her as our primary resource.   The next day she brought in her book and talked specifically about what her family does.  The kids asked great questions and she shared great information!  It was AWESOME!


And, to celebrate in a different way than normal, our Christmas party was really Then and Now centers!  The kids had a real blast!!  It was so great!  My wonderful, former teacher, homeroom mom ran the station for quill pens!  Her sister-in-law works at Old Williamsburg and this is her actual job, to use quill pens and write tickets, etc.  My homeroom mom was given a set of quill pens and she dug them out of her stash to bring them in to use! The focus of the center was to learn to write like in the past, because they would write Christmas letters to friends. It was truly amazing to see the difference in kids’ handwriting.  Those that struggle to form letters with pencils did incredibly beautiful handwriting.  (What are we doing wrong today then!)  The kids worked diligently to create the letters and really loved this part of the first station. 
My AWESOME Homeroom Mom!


 I even had to try!  Big letters created splashing. You use sand to blot it up.  Small letters were easier and faster to form.  Cursive was much easier than print!

To complement this, we created modern day Christmas cards with stickers and glue! 


Our next center focused on a ball and stick game that was individual.  You had to catch the ball on the big end, the small end, or the stick in the middle.  Not an easy task!


While one player was doing this, the rest were playing holiday bingo!  Good stuff!


Our third station consisted of making an old-fashioned snowman clothespin.  The kids loved adding details to this one!


After they finished this, they created a modern plastic foam ornament with their picture on it! 

Our final center was trying out food from then and now.  For then, my homeroom mom cooked up some Wassail (spiced ciderish drink) in a crockpot right in class!  The kids were able to taste this drink and decide if they would like to drink this all the time!   Many said yes!  The other part of this center was to create a decorated cookie with sprinkles and the like!  Needless to say, it was one of their favorites! 


Overall, I’m really pleased with how great this unit is going.  I say going because I’m nowhere near finished!  I still have Jingle Bells and Skating close reads to go.  These are the most wintery to do after break.   I found this awesome video on Pintrest to go with Jingle Bells.  I think it will be a great way to introduce transportation in the past to my kids. It gets the point across well! 

I’ve also learned a few things about kids’ beliefs about "then".  They have no concept of how important fire was to people in the past-that they were not “kept” from it.  What I mean is that I’m sure they were afraid, it was something to be afraid of.  However, not like kids today.  They don’t understand that children handled fire, that it was used all day, every day, for many things.  The conversations about the candles on the tree alone were enlightening.  So, I’ll be creating something for fire too!  But, for now, I’m madly creating “The Sandy Day”, 


I'm going to the beach on Friday! 

a fun winter project for those of us who don’t have snow or anyone who would just like to have a fun compare and contrast unit for snow and sand! 


November 26, 2014

Holiday Whole Lot of "Nothing" Going On! (Or How I Came to my Then and Now Package!)

Today I have done a lot of “nothing”.  Yeah, I know, it’s break, but I feel like it has been nothing.  Really, it’s been a whole lot of randomness.  I’ve cleaned, I’ve cooked, I’ve tried to nap, I’ve worked on product, I’ve checked FB numerous times, and I’ve been on Pintrest too.  I just can’t seem to find the thing I want to do!  So, in my randomness, I write a blog post! 
This post deals with my up and coming month that covers the Holiday season.  Last year, I made a deal with myself that I WOULD NOT put off the Holiday fun like I did then.  It was a very sad reality that I did ONE thing last year with my class.  There was so much to cover and so much pressure to get it done that I just couldn’t!  I promised that wouldn’t be so this year!  Well, now I’m in a new grade and have new curriculum.  Here’s the reality-even with little guys I could easily wrap myself around the heavy curriculum expectations and loose the joy of the season-and that’s sad!  Before break, one of my teammates said that she was going to stop doing the reader and put all her benchmarks into Thanksgiving activities! 
         Sounds great, right! Well, where is the time to do this!  I mean, this is what I have done for years, but time has been sucked up into oblivion and, even when I have it, I’m so exhausted and over it that I do what I did today-“nothing”-random acts that don’t get anything done! 
         So, where does this lead to you ask?  To this:


I created this to be sure that my Holiday fun doesn’t drizzle away like the time I’ve wasted today!  Inside of this package, I am happy to say, is how I am covering my standards and allowing for some good, ole’ fashion fun-no pun intended!
          I am really excited about this package too!  I mean, I can add all kinds of crazy fun ornaments and activities to this and still meet standards.  So, here’s a quick overview of what’s in here:


 I realized that I didn't include the Hanukkah materials on the preview.  So, here's a quick peek.


        Take a minute to look at the bottom of the question page.  I added these cool check boxes so that the kids can really work to identify the changes over time to each area we read about!  I'm very excited to see how that goes!  

              So, here is what I am promising myself (and, now, you!)  Over the course of the next few weeks, I will be posting the fun "extras" I do with this packet.  I have a great idea for my hallway display that involves those gingerbread shapes you see on the preview.  I have a number of ornaments that I am going to be creating (and even have some comparison ideas for additional "freebies" here on the blog!)  So, check back often over the next few weeks to see what we do with this fun Holiday packet and still keep our curriculum flowing!


November 11, 2014

Science: What If?

      
My Super Scientist Posters cut apart and used as headers!

      This year when I looked at what I was supposed to teach for the Nature of Science and thought the same thought, “REALLY!  They ask us to teach this stuff and give us NOTHING, EVER!  How in the world am I going to teach this?  Where am I going to get all this stuff?”  Now, I know this is exactly what most teachers think.  It’s true!  We are asked to teach and then not given the materials that help us to actually complete the tasks, especially in Science.  And then we think about that person on campus who usually has the stuff!  We think, “Well, I bet THAT person could teach all this and have all the supplies!”  And, suddenly, I realized I was one of the three people on my campus that they would think of!  That stopped me dead in my tracks-ME!  They would think of ME!  So, what’s my excuse at that point?  I had to adjust my thinking.  I had to eliminate my excuse.  I had to think, “What if?”  What if I taught this with the tools?  What if I did it in a creative way?  What if I created my own Science Notebook?  What if it WORKED?  And that was my new “What if” ….create a tool that uses as many pieces of science equipment as possible, teach the tools, make it fun for kids, and make it realistic with supplies that are on campus or in a grocery store!  And with that, ToolsScientists Use:  A Notebook for Little Scientists was born!


The notebook was just a portion of the whole package!  Students were able to record information about the experiments in their booklet.  It was an easy access point for each lesson and did guide our work.  Here are some of the activities, through pictures, that are in the notebook! 

First, they design what their notebook would look like.  We read a book and discussed the different types of scientists.  Then they designed their cover.


Measuring tools came up first!  I didn't even know I had these tools in my closet till I put them all together in one location!!


The first measuring activity involves measuring each other to discover how a tape measure works.


The second measuring activity deals with weight and balances!


There is one dream in the childhood science experiences that every kid has-to wear goggles!  And, here they are doing it!  


Dancing Raisins!


 Sadly, we used an online source for the microscope!  I couldn't get any slides to work!  I think I need my eyes checked!!


The last day we completed the Test Tube observation!


They were very excited!


The results as they were "developing", literally!  The next day they were even better!

And, there's more than just what you see here!  Droppers, thermometers, and some others.  Sadly, I had to reset my phone (due to my poor memory!) and lost those shots.

I was very amazed at how the kids really loved what we did!  They looked forward to it each and every day, no matter what the results were!  Their notebooks were great, and we did have to work at a number of the skills!  But here’s the best part!  The assessment!  I created this craftivity to assess the students according to what they learned. 


         Each side of the coat represents what they learned.  One side says "This is What I Know about Scientists".  The other side says "This is What I Know about Scientist's Tools".   This is what the whole point of our learning was about!  Could they explain the tools, could they explain what scientists do?  There has to be more than, “You did these great experiments, you’re good!”  I think this is the key to what this whole unit needs!  But let me go on before I go on!! 

     In the middle of the scientist is an experiment developed by the student.  This was something my district put in our road maps.  Here’s how I tackled it!  Each Friday, I have Book Buddies with an fourth grade class.  These students have also studied tools and the scientific method.  This was the perfect opportunity to have that extra hand for my students that was needed to make this self-developed experiment a reality.  The 4th graders worked with my first grader to come up with an idea.  Then they helped the first grader record all of the information they could onto their experiment paper.   This was the first Friday of work.  

     On the second Friday, I had all of the tools available for the students to use.  The team of kids conducted the experiment together and recorded the results!  This was a great way to complete this difficult  task for an individual teacher to do.  My kids learned a lot, the 4th graders had a chance to reciprocal teach, and I could assess the kids successfully on what they completed. 

     Now, let’s go “there”!  Many times I thought assessing this type of unit was done through the assignments themselves.  I didn’t have the gumption or the time to do what the assessors asked for.  So, here’s the “What if” to come back to the beginning-What if we did assess this “stuff”?  Here’s what I discovered.  Although students knew the tool as they were working with it, they had a hard time communicating what the tool really did and what they learned.  Students still couldn’t explain what scientists did, even though we discussed it each day and we worked at it through the experiments.  What does this REALLY mean?   We aren’t doing enough, especially at the early ages, to get this information across.  Would I change what I did-never!  Does it have me thinking for the rest of the year?  Yes!!!  So, is teaching and assessing this information worth it-YES!!!  It should raise a variety of questions for you, teaching directions to follow, experiments to develop!  This shows me that EVERY unit needs the exploration of experiments and EVERY unit is worth the time to take to do this!  


     And, as just a reminder, I was one of the 3 people on my site that people would think about for using the tools.  So, where did I get them?  I borrowed from the other two!  I don’t know a science-based teacher who won’t lend out materials, so hit them up!  Also, if you need upper grade kids for help, ASK!  This could be a grade for them as well, as their teacher monitors what they are doing and their mastery of the scientific process! 

     I’m hoping this raised some thinking for you, because it did for me!  What kinds of questions do you have about science and the topics discussed here?