Image Map

June 27, 2019

Multiplication Mall to Prove Multiplication Strategies Success!

It wasn't too long ago that multiplication was a rote memory skill-one that simply included memorizing to "know" your multiplication skills.  Now, multiplication is about understanding-and that is a huge improvement upon just knowing the facts by heart!  So, what would make it even better?  How about a project that includes proving multiplication strategies success!  That's what Multiplication Mall does!  


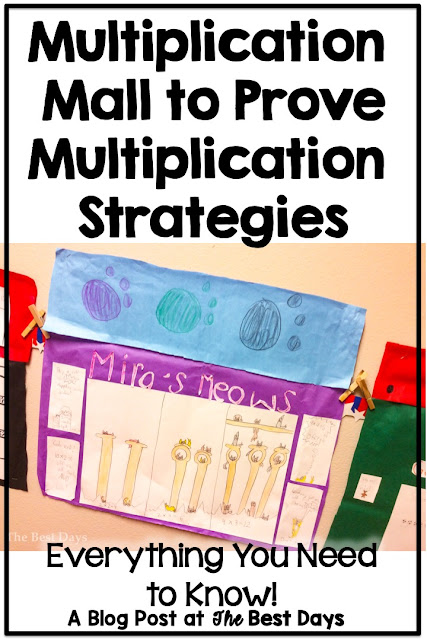
The purpose of Multiplication Mall is to prove multiplication strategies through designing a "store" in the mall.  Each part of the "store" provides evidence that a student understands a particular skill in multiplication.  Let's break this down!  

Starting the Project

Students need some foundation with the basic of this multiplication project. This is where brainstorming comes into play.  Work as a class to brainstorm the type of stores that are found in a mall to get their creative juices going.  You will also need to work on learning about alliterations.  Luckily, there are posters within this product to guide your students with alliterations!  


Multiplication Mall posters

Assigning the Project Steps

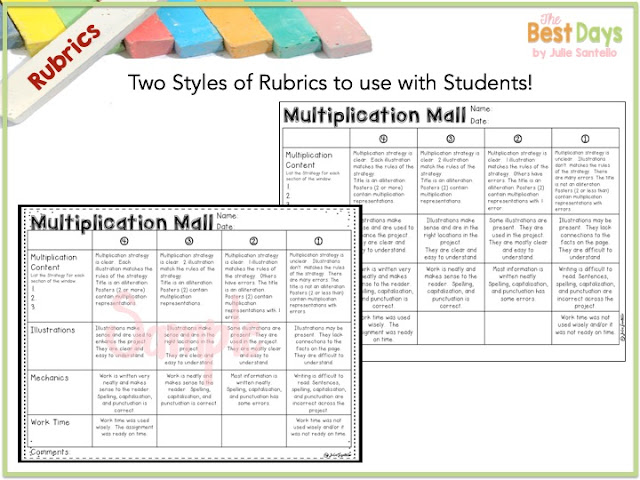
Next, students will dive into the project itself.  Provide the rubric to students along with the Planning Page.  This is where students will make critical decisions about what their store will "sell".  A rough draft like this allows students to make mistakes BEFORE they get to their final design.  It is critical to allow this because it builds in success in the final product!  

Students will also work on the posters that hang outside of their store.  Both the windows and the posters are designed to prove multiplication strategies that students know.  To help guide their choices, there are also posters representing each multiplication strategy that students can choose from.  Once all of this is designed, students will then get the teacher's approval to move forward into the final design stage! 

Completing the Project

Students will need bulletin board paper and construction paper to complete this project.  You will need to cut the bulletin board paper, also known as butcher paper, to the size that students need.  This needs to be large enough to fit the piece of construction paper that will house the windows on.  You will also want to have white paper cut to design the posters also.  Once this is done, allow students the chance to create!  Step back and watch what they will do, you will be amazed!  


Sample Multiplication Mall Project


Final Thoughts

Projects are about proving what students know.  Allow students to self grade their projects will give you insights beyond what you can learn by grading them yourself.  It is a relatively easy process.  Give students a yellow highlighter.  Let them work through the rubric, examining their work to best judge themselves.  Then, once they turn it in, grade the project with a blue highlighter!  Anywhere the teacher and student agree, it will turn GREEN!  How cool is 
that!  


Allowing students to prove multiplication strategies for success is an easy way for you to show that students have mastered the standards of multiplication.  But, it is more than that!  It is a way to provide a creative, fun way for students to show what they know!  Grab it in my TpT store!  And, let me know what your ideas are about proving multiplication strategies in the comments!  I'd love to hear!  
Multiplication Mall project


Pin for Later! 


Multiplication Mall Pin


June 20, 2019

How to Use Project Based Learning to Put on a Parade!

Have you ever wondered how you could easily add a Project Based Learning activity to your classroom?  Are you wondering how to put the project on display?   Sometime it can be merged as one!  Simply put on a Project Based Learning Parade!  


Float Parade Blog Post header


Where to Start?

First, pick a theme!  Every parade has a theme, so a Project Based Parade should have a theme!  Dive into your curriculum to see what could be developed into a project with the outcome as a float-because that's the point of a parade, great floats!  Here are two ideas:  

State Park Floats:  This project explored both the state in general and the region of the US it is found in.  It is primarily to learn about the 50 States.


State Park Float


National Park Floats:  This project explored both the National Park's history and the ecosystems found there.  It incorporated the food chain found in the National Park.  


National Park Project float


You see, both of these have a rich research base.  So, another piece of advice when diving into your curriculum is to look for something with a rich research base.  State flags, maps, park outlines, dates, ecosystems, tourist spots, etc. are all parts of the research base for this kind of project.   What topic are you studying that can allow for this rich base to be met?


Technology Integration

Next, you need to think about how much technology integration do you want?  Students can create research outcomes to accompany the float through the use of technology.  PowerPoints and other documentation can be help students to organize and present the information that they need beyond the actual parade float.  Consider this in your decision making process.

State Project


National Park Project


A post shared by Julie from The Best Days (@thebestdaysclassroom) on


Research Time

Questions about Research Time include how much of a guideline do you want to provide, how much time do students need, and do you want them to complete research in class or at home?  This will also determine your lesson plans and the development of your research questions.  This last point is key to where students go.  Scaffolding them in their research will help them to feel successful throughout the process, whether completed at home or at school! 


National Park Pages Preview of student work


Presentions

Next, you will want to think about how the presentations in class will be planned and what you will need for them.  Developing a rubric is SO important to this part-and the whole!  Research says that when teachers provide  a rubric, students can succeed at a greater rate.  Plus, it eliminates any negotiation for students who do not complete the task.  So, develop that rubric and get it into students hands!  


National Park Project Teacher pages


Once you are ready to present, have volunteers go first.  Students who are comfortable presenting will boost other's confidence and provide a foundation for others.  I try to pick students I know will offer great presentations so that others see and know what the expectations are.  This will often spur them into practicing more too!


The Parade

Finally, coordinate the parade beforehand!  This means you should send our emails to your staff to let them know the day and time you will be parading!  Students in other classes give the project builders the ooo's and ahh's that just make them feel successful!  Visit as many grade levels and classes as possible!  This means lots of eyes on their projects and a desire to make projects in the future!  That's a key to great project success!  


Once you have engaged in a Project Based Parade you will fall in love and want to do it every year!  Here are two projects to get you going - they provide everything you need for a great project parade!  


State Float Park Parade


National Park Float Parade Project


As always, I'd love to hear from you and what you like to do for Project Based Learning!  Drop a comment below or follow me over at Instagram or Facebook for classroom updates!  

Pin for Later:  


Float Parade Pin


June 13, 2019

7 Must-Have Items to Make Your Bird Theme Classroom a Hit!

I had come to a conclusion.  I was no longer happy with my classroom theme!  I wanted my classroom to take on a different feel, one that would represent more of who I was, even as a teacher.  I LOVE superheroes and had used this theme for about 5 years, but I needed a change!  Watercolor is all the rage, but I'm not a succulent kind of girl!  So, I wanted something more "me" and, to be honest, more kid friendly. (Most kids don't know what a succulent is!) So, I dove in with an idea-Watercolor Bird Theme Classroom!  And, it was a hit, even with the boys.  So, here are 7 must have items for your Bird Theme Classroom!


1.  Table Signs


Watercolor Bird Table Signs

I just love being able to remember my table numbers!  Yes, because half the time I can't remember with so much going on!  These are designed to be placed back to back-so you get birds and birdhouses in this product. Simply print, laminate if you want, and staple them back-to-back.  Then, I used fishing line and paperclips to hang them.  That way, you don't even have to poke a hole!

2.  Calendar

Every great classroom needs a beautiful calendar (even if the month never gets put up!)  This is print and go ready with everything you need - days of the week are included!  I paired it with my Watercolor Bird Theme Editable Job Cards, which is make a really nice bulletin board-especially when you add the month!  Ha!!


3.  Birthday Display

This was so easy to use!  I simply printed out the months and stapled them to the wall.  Then I used my Cricut to cut out the banners.  I used KG A Little Swag Font (Free for Personal Use) to create the banner!  I then added the colors of the decor behind the banner to give it the punch of color you see here!  LOVE this!  


Watercolor Bird Birthday Display

Watercolor Bird Theme Birthday


4.  Schedule Cards  

I didn't have my schedule up right away this year and I paid for it with my students.  I tend to play around with my schedule till I get it "just right", so I always wait till it is "just right" to put it up.  And then I paid for it for the first month.  The students constantly asked, "When is..."  Once my schedule is posted, both with the written time and the clock time, I don't answer those questions any more!  It trains the students to learn the schedule and the time.  And, isn't that the whole purpose of having it posted!  As you can see, I didn't use the editable part, but it is there for you to use!  


Watercolor Bird Theme Schedule Cards


5.  Go-Home Banner

Our school is big on knowing how kids go home so I have embraced the Go-Home Banner!  I write the student's names on their go-home mode of transportation with a dry-erase marker so that I can change them if they change transportation.  Then, at the end of the day, this is how I also call the line-up order for going home.  I switch who goes first each week based on the chart and the students LOVE that!  Who knew something this simple would bring so much pleasure! 


6.  Word Wall


Everyone needs a Word Wall!  Student can access words they need easily and teachers can add words that students need to spell regularly if they are not already on the wall.  I use simple card stock pieces of paper under each letter that I have typed common words that 2nd graders need on them.  Then I handwrite words in as the year goes on.  Easy-Peasy!  


Watercolor Bird Word Wall


7.  Great Bulletin Board Paper

A great looking room many times relies on great bulletin board paper!  I grabbed this Pacon Fadeless paper from Michael's at the beginning of the 2018/19 school year!  It was the PERFECT match for this Watercolor Bird Themed Classroom!  In addition, I added white and azure blue scalloped bordette from Lakeshore Learning!  LOVE! 


Watercolor Bird Classroom Decor


Now, there are more choices you could add to your classroom!  Good thing they are easy to find in my Watercolor Bird Theme Classroom Decor Bundle!  


Watercolor Themed Classroom Bundle


All of these goodies and more are found in this set!  You could add the alphabet, number cards, rules, and so much more to your awesomeness!  There are many more editable materials in here too!  And, while you are checking it out, grab this FREEBIE!  


Watercolor Bird Theme Rules

So, drop me a comment on what you would add and any other ideas you might have about this Watercolor Bird Theme Classroom Decor!  I'd love to hear what you have to say! I'd also love for you to join me on my classroom adventures!  Follow along at Instagram and Facebook for all the latest news!  

Pin for Later


Bird Blog Pin


June 6, 2019

Why Contraction Surgery Succeeds!

Contraction Surgery is such a simple, yet wonderful, way for your students to succeed at learning contractions!  Often we think and believe that contractions are an easy skill for students to learn and understand.  When we apply a project to this skill, it becomes a delicate art of skill and knowledge hidden in the fun of Contraction Surgery


Student engaged in Contraction Surgery.


My interest in Contraction Surgery started years ago when I saw a simple pin online, even before Pinterest was a hot spot for ideas.  Just the picture alone got my mind spinning!  I was teaching first grade at the time and thought, "I'm going to do this!"  I created this product, and headed on my merry way!  And it was FUN!  

After being away from Primary teaching for a few years, I have returned to Second Grade with the promise in my heart to complete Contraction Surgery again, and really dive into discovering why it is such a success!  


Why is it a Success?

Contraction Surgery wraps two things together that make it a success.  These two things are hands-on learning and FUN!  Yes, I said it, FUN!  Imagine that in today's learning environment!!  So, let's start there!


Students are engaged in Contraction Surgery

FUN!

Contraction Surgery is FUN if you make it so!  You don't have to create a total classroom transformation for this to happen.  I did something simpler.  I added some blue Dollar Tree table cloths to the ceiling for a "operating room" feel, bought some masks and gloves from Walmart, and, with the help of another teacher on my team who participated with this in her room, gave students hospital gear to wear!  (Donations from doctors offices and emergency rooms can help you gather these things too!) 


This classroom is set up for Contraction Surgery!


I dressed in a super cheap scrub from Walmart! Our Dr. Apostrophe decorated our board and welcomed our "Contractionologists" into the surgery suite!  


Contraction Surgery Dr. Apostrophe welcomed students to their surgery day!

 I also hit the bulletin board paper room for the "surgery table" covers.  I also rolled out a long piece of paper on the floor for our "patients" to "recover" on.  All this set the stage to engage and get the kids ready for FUN!  These steps are so simple too, so don't skip over these fun little extras!  


Student table is set up for Contraction Surgery

Hands-On Learning!  

Don't underestimate the lack of understanding students may have with contractions!  Contraction Surgery provides the opportunity for students to manipulate the word cards in a way that goes to their higher-order thinking. They must analyze the word and work to create the new contraction.  Many times we take it for granted that students just "know" the two words, because we use contractions all the time in our conversations.  But, in reality, this activity makes them deconstruct their knowledge of contractions and work in a backwards thinking process.  I "know" contractions, but now I have to apply my knowledge to the process in front of me-much more difficult than we can imagine.  To scaffold this instruction, I allowed my students to access a contraction list and to "consult" with one another!  


Students enjoy helping each other with their Contraction Surgery work!


I also allowed students to perform "emergency measures" on words that were incorrectly formed.  This meant that other students could pick up "dying" patients from the recovery room and fix the contractions they found were errors.  We saved these to be talked about later!  

So, as you can see, although we think contractions are easy for students to apply and learn, it, in many ways, is an opposite situation!  By creating a fun, safe environment through Contraction Surgery we can allow them to practice the process in a way that is both memorable and fun!  


Contraction surgery was a BLAST! I had completely forgotten how amazing it was! It was engaging, rigorous, and fun all in one! And guys, we are making assumptions about what kids know about contractions! I had most of my class needing to access our Kindles and Enchanted Learnings list to feel successful at this! They learned a lot and had a great time doing it! Product link in the bio!! Honestly an amazing process and so worth the time!! • • • #secondgradeteacher #secondgrade #secondgradefollowloop #secondgradetribe #secondgradeteachers #secondgradefun #secondgradesquad #secondgradeshenanigans #2ndgradeteacher #2ndgraderocks #2ndgradeclassroom #2ndgradeswag #2ndgradefun #iteachsecond #iteach2ndgrade #iteachsecondgrade #iteach2nd #classroomtransformation #teachersfollowingteachers #contractionsurgery #teachingcontractions
A post shared by Julie from The Best Days (@thebestdaysclassroom) on

And, what's even better is that it doesn't have to stop there!  You can provide additional practice with contractions in this product!  In addition to getting everything you need to make your Contraction Surgery a success, you get additional practice pieces!  


Click to find Contraction Surgery in my TpT Store!


AND, so fun items to make a great page in a school memory book or just to take home to hang on the fridge!  

I'd love to hear your thoughts on Contraction Surgery, so drop a comment below!  Also, to check out all the things going on in my classroom, I'd love for you to follow me over at Instagram or Facebook too!  


Pin for later!  


Contraction Surgery set up!