As we approach any American Patriotic holiday, we want to bring that celebration into our classroom! Whether it is during President's Day, Memorial Day, the Fourth of July, or even Labor Day, we are proud of our American Heritage! Here are 5 Patriotic Products that will make any elementary student celebrate-or teacher too!
Patriotic Product #1: Patriotic Scoot - Addition and Subtraction with Regrouping
This product has kids up and moving while checking out patriotic pictures! Kids just LOVE to play SCOOT! There is a pre-made work page, so students can SCOOT with ease! And, this is 3 digit by 3 digit problems, so late 2nd graders all the way up to 5th graders can benefit from this continued practice! That's one way to make kids happy on a holiday and still get a skill practiced in math!
Patriotic Product #2: Primary and Secondary Source Superstars
Students will just LOVE this exploration of George Washington through Primary and Secondary Sources! Students will take a virtual field trip and discover what Primary and Secondary Sources are through infographics! There is a leveled reading passage as well! This is just a great way to celebrate America and learn at the same time!
Who doesn't LOVE a parade! Especially when the floats are created by your students! This project is a great way for students to gain knowledge about our great 50 states and have a fun parade to teach others too! Students research a state, create a float and research project, and, then, parade their state for all to see in a school-wide parade! And, if states aren't your thing, you can always be patriotic with the National Park Float Parade!
Take a trip back to when America was just starting out! Colonial America was an exciting time to be in America! And, children had so many choices in toys-or, at least, to the toys that their imagination created! And that's the basis of this STEM! Students will use the "technology" of the time to create games or toys that students in Colonial America could play! That means NO COPY CATS of toys of today! Get your student's creative juices flowing with American pride through this STEM project!
Patriotic Product #5: Yeah and Nah Voting Sticks Freebie
Students everywhere will LOVE voting just like our legislatures do! And, even better, they can fly their Yeah or Nah high in the air with this freebie! Simple to print and hot glue to tongue depressors! Then, just pass out and vote away! So much fun and FREE too! There you have it! Five Patriotic Products to make any elementary student celebrate and learn in your classroom- for a holiday or any day! Just let me know in the comments what you think or a great patriotic holiday idea you have! And, jump on over to Facebook and Instagram to follow along with my journey through posts and product updates! I'd love for you to join me! Pin for Later
Whether you have primary or intermediate students, I know the month of February is packed-each with it's own fun, problems, and issues to cover. Writing shouldn't be one of them! I've got you covered! As you know, I've been talking a lot about writing in my classroom lately. I've given up the boxed programs for a more "old school" approach-actually TEACHING in CONTEXT! Imagine that! Anyways, now that January is heading out the door, I want to cover some of the things I plan to do for February. Here we go!
Today I am double posting! I'm over at Conversations From The Classroom talking about how to have fun with STEM and writing through the use of one of my products called Love Bug in a Jar This has always been one of my favorite prompts to write about and I'm sure this year's group won't disappoint! Check out what I'm sharing if you love this idea-I think you will!
If that doesn't fit your needs, I have two other great products for Valentines that just might. Both focus on Valentines but are geared toward text dependent writing prompts. These are designed to provide practice for your students in the area of reading prompts and, then, having to write with source materials in their pieces. These are print and go ready too! One of the things I've done in the past to help cut the copy costs is print the reading pieces on card stock and then laminate them. This way I can use them over and over again!
Click on the pictures to view these products.
How about Groundhog's Day! I've got you covered! This great narrative piece will let kids think about how the groundhog would feel being awaken from a sound sleep to be jolted out into the cold world to see what the weather would be for the next six weeks! Is it me or have you ever really thought about the inaccuracy of that! The sun has to be out for the groundhog to see his shadow! Wouldn't that mean spring is on it's way and not more winter! But, it's a fun tradition and that groundhog lives high on the hog-pun intended!
Right after Valentine's Day, we head into President's Day! Students would just LOVE writing about a day with any President of their choice. This can be simply a narrative piece, or, for added bonus, use this document to do some research about a President. Then, students can use that research to create their day with a President! How fun is that!
As February winds up, intermediate students would love to explore the history of snow globes! Students are provided with three pieces to read and examine. Once they gather vocabulary, notes, and ideas about the history of the snow globe, students write about their new knowledge. Then, they get to try their hand at creating their own snow globes! This was is so, so much fun!
Don't forget that the Winter Games are coming! This product has a little of everything! Students can do a quick research piece on one of the sports they are interested in. Once the mini-research is completed, they craft an informative essay as to why that sport is their favorite! Then, students create a topper to match their choice! These would look great in anyone's hallway or classroom!
Happy New Year everyone, even if it is a little early! Or, you may be joining me for a look at this STEM based off a duplicate product found in my store! Either way, be prepared for some FUN with STEM and Sound Energy!
In this STEM you will find the following steps: Ask, Imagine, Plan, Create, and Improve. I have also included a chance to Reflect on this STEM though a quote provided to inspire deeper thinking about this activity. It is important to know that while STEMS come with a variety of step models, each of these models cover the same principles within STEM. The key is that students apply the principals of creativity and engineering. Students should be developing systems and ideas based on what they see as the best form of applying their personal skills and the concept presented to them in the challenge at hand. That means you are as hands off as possible. The only thing I really did in this STEM was to manage supplies, cut the duct tape (because it is REALLY sticky), mark the results, and vacuum after the clean-up (More on how to avoid this from my lesson learned to come!) So, here we go!
First, students were able to apply their understanding of sound energy from their schema from our lessons in class and from the video suggested in the product found here. This is the ASK stage!
In the product, you will find an open note taking page and a guided notes page. With my third graders I use the guided page. I also let them watch the video once through without taking any notes. Then, I stopped it at spots so they could write down what they learned because she talks REALLY fast! You could always swap out this video with another, as the Powerpoint allows you to embed any video you choose (directions are included).
Once my students worked through the ASK stage, they moved to Imagine. This is where students had to think about the Criteria and Constraints involved in this activity. In other words, what the could and could not do. These are established to keep students within a boundary so that they are not getting off task and wasting time going down bunny trails or even socializing. In this STEM, one of the Criteria is that they must have different designs for each team member's noisemakers. This was key, as one team got off target because, during create, they decided they liked another noisemaker better. They all wanted it and headed down that bunny trail. I was able to redirect back to the criteria to get those students back on their PLAN!
Yes, that's the next step, PLAN! In Imagine, students are simply brainstorming all of the possibilities that they have. This PLANning stage allows them to square up the actual plan they have. In this case, this is where students developed a specific system to make noise and decided on what supplies they needed. I supplied them with beans, rice, cereal, duct tape (needed but STICKY), paper towel rolls, gift wrap rolls (A parent brought them in!), paper plates, jingle bells, fabric, embroidery hoops, cups, tongue depressors, staplers, regular tape, and glue. Then I opened my classroom cabinets to them with the understanding that it couldn't be anything that I needed back from them! Many of these things were already in my room. I did utilize parents for some of the things that needed to be purchased (beans, rice, cereal, jingle bells). I gave them a good amount of time to plan. They did a very good job of planning and knew what they needed when we moved onto CREATE!
CREATE is the time that they will actually BUILD their noisemaker. I provide a half hour for this step. This seems to be a fair amount of time for all groups to be able to be ready, based on the STEMS that I have completed so far. This did not include the time I used to pass out supplies. I did this pre-CREATE. I had student team members come to a table area and pick up supplies such as the rice, beans, and cereal. This is where I didn't think! Before they started CREATE, I should have laid down large pieces of bulletin board paper. We had a little bit of a mess from kids not knowing how to pour the materials. I was able to show them how to make paper funnels after I discovered that pouring didn't work so well. I would definitely suggest this for your classroom before you begin! I haven't vacuumed in years, as we have wood floors at home and I sweep! It was an experience for sure! Anyways, students went fully into CREATE mode and were able to complete this step within the half hour provided!
Now it was time to test their systems! Included in the product is a fun slide in the Powerpoint just for this! It includes a website specifically designed for detecting sound levels in the classroom with a fun graphic-Bouncy Balls! I used this and set the bouncy balls on the lowest amount available. Then I explained we would use the large bouncy balls, as these are the hardest to move! I also explained to students that they were not to make ANY noise with their voices (unless they made a horn type of noisemaker) because 1. they could be helping another team win or 2. they would be getting a false read on their noisemakers. Then I stood at the board and marked the three highest bouncy balls that each team achieved! This is how we judged the assigned group winners!
What we did next was even more fun, and this is also where we got into some serious science application! I allowed kids to group randomly and we tried it again! And we got totally weird results. Weird in the fact that we were able to see how variables affect an experiment. When students were randomly grouped, meaning they were with similar equipment made by other students, our data flatlined! They were not able to create sound higher than the original groups of differently designed noise makers. More importantly, they got a hands-on experience with variables! I love that we could apply that science term and skill in this very minute! Real life application!
Next, we headed to IMPROVE! Students were able to look at all the different noisemakers and discuss and plan for even better noisemakers. Also included in this was an opportunity to reflect. IMPROVE doesn't always have to be about the STEM. It should also be about how they could be better as students-with each other and within creating and growing. Right now I'm getting a lot of "we worked good as a team" instead of those deeper reflections as a cooperative group. That is going to be one of my goals as we get more and more into learning about how we work together in STEM and how this connects to us working as a team in other areas of our classroom.
I'm totally excited to add STEM to my growing knowledge of the Student-Led Classroom. I can honestly say, I can see this being key in the development of how students lead in a classroom setting. If you'd like to learn more about Student-Led Classrooms, jump over to my general post called Just the Place to Start. Are you interested in checking out my growing STEM products? Check them out over at my store, The Best Days!
More importantly, thanks for stopping by. I'm super excited you did and would love to hear any feedback you have about STEM or this idea, in general. I'm still learning and would love ideas, suggestions, and even improvement ideas you may have!
I'm SUPER excited to be teaming up with a number of Teacher Authors to celebrate Setting the Standard's 1,000 Follower Giveaway! We all just LOVE followers, and, even more, sharing great things with you! So, let's take a look at how my class will be celebrating Valentine's Day this year! My class LOVES Scoot! We've played it often. As we have moved past division, I want to keep reinforcing this concept with them to keep the skill fresh.
This Valentines Day Division Scoot is the perfect product to play with them! I made sure that I put all types of division problems in the Scoot to cover all the different ways that students are responsible to understand this standard. It is a black and white design, so all you have to do is print and go! I know they are just going to love playing Scoot and this will keep their excitement in the morning to a minimum. For Language Arts time, we will be using some articles that I created for a writing project I've made. We honestly are in the middle of a big writing project on snow globes, so we just can't jump over and add a Valentine one. So I had to think a little differently! The articles are great in themselves, so I thought, "Why not!" I can use them to address all kinds of standards! The newspaper article is descriptive in nature. I will be starting with that and we will be pulling it apart to discover the elements that make it descriptive. This is Standard 8 and it really kicks up the understanding of text structure in 3rd grade. We've taken lots of time to talk about how these structures work and identified them by name, but it is time to take it to print! I'm super excited about this! I can't wait to see how their hard work will pay off! Here is a freebie you can grab over at my Google account for Compare and Contrasting Text Structure! Read more about text structure on my blog too! As our party gets closer, their excitement will grow. I've found a fabulous freebie to use with my kids! It's called The Heart Building Challenge and I found it on Pinterest! This will take a little bit of work on my part since I don't have Leggos in my class. A simple email to parents will solve that problem! Once I get the baggies of Leggos, I will work to set up teams that I find to be equal in abilities. This will be key! I am thinking of having them in 2 person teams since this will be a whole class event instead of Here's a video from Mrs. Beers to show you the low-down! I think they will LOVE this!
After recess we will celebrate our Valentine's Day with a brief party that includes the exchanging of Valentine cards! This will be perfect because our reading from earlier in the day will share some of the history of Valentine's Day cards. I plan on giving this cutie as a card/homework pass/brag tag! You can grab it as a FREEBIE in my store!
Now for the GIVEAWAY! How cool would it be to win that cute shirt and a $30 TARGET card! Now that's sharing the LOVE! Fill out the Rafflecopter below and then move on to the next great Teacher Author who is sharing the LOVE- Big Ideas for Little Hands!
Happy Friday everyone! I'm hooking up with Doodle Bugs Teaching to share a Five for Friday! This week I've gone around my school and found 5 great doors for Fall! Door décor-on my campus it is a big thing! Each season teachers and parents work together to create many door displays for each season. Some are simple, some are more complex. Not every class does this, but it is always fun to check out the Pinterest and non-Pinterest displays. Here are some of the fall themed doors found in our building right now!
This door is very Pinterest. In fact, it was one of three doors in the building. It is adorable though!
This cute door is across the hall from me. The leaves have the kids names on them. I like how the tree comes off the door and is on the wall.
I think this door is great! Each pumpkin has writing by the kids in this class. Yes, all those kids are in this class. This is one of our co-teaching classrooms.
This door is a"door"able! The cute owl on the door is the teacher. Then the VERY artistic mom in this room had the kids make those cute owls hanging on the wall.
Here's one up close. I just LOVE these adorable owls. I am going to save this craft idea for next year. The owls, mountains, and other parts are made of foam. The wood is paper. LOVE these! (I read my students Poppy and these can totally be a Mr. Ocax craft!)
This door is AWESOME! I have to admit, it is mine! It is really awesome though! My mom's worked really hard at it and it extends down the wall. Each student has a picture on a pumpkin and the wall says, "Welcome to Our Patch!" I just love it!
So, there you have it! 5 Fall Door Decor that you can enjoy or try out! Don't forget to pin them to your Fall Pinning Boards to keep for later! While you are there, feel free to follow me!
I’m going back to then, which was only about 10 days
ago!Yes, all the waaaaaaaay back to
then!Why, because I’ve
procrastinated!Yes, I have!I’m really good at it too!So, where did I leave off-oh, yes, then!I’d like to step back in time to the fun we
had in class learning about then and now!
I actually have to go back to earlier in December
first.We had an awesome time learning
about the history of the Christmas tree.Remember I said I’d share a great idea I had for a hall display.Here it is!(Pin it for next year!)
We started with a tree in the hall.Nothing fancy.In my packet I put some printable ornaments
from then.We started there.
I then created some
now ornaments (I will be updating the packet to include these for those who
purchased it!)
This is our final product!It came out AWESOME!I got lots
of complements from other teachers about how great it came out.The kids loved looking at it too! The great
thing about it was that the kids could use the tree as a visual to help them
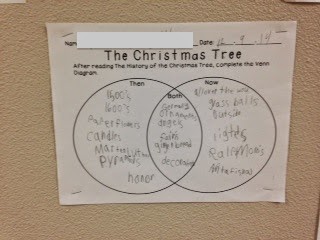
with their Venn diagram.
They loved completing the time line also.We’ve learned a lot about Queen Victoria
because of this unit!She’s responsible
for many of the elements of our holiday (making it stylish!)
including having a Christmas tree in the palace and sending Christmas
cards!Who knew!
Anyways, we had some real fun with ornaments too!Here are two that we made with the St.
Nicholas/Santa Fresh Read included in the packet.They are great fun to make!
Hand Santa
Trace your hand with your thumb pointing out and your fingers together.
Glue the red paper across the thumb area.
Cut around the hand to create the hat.
Stretch a cotton ball out.
Put glue on the beard area. Glue the stretched out cotton ball there.
Take a second cotton ball and pull off a ball. Then stretch the rest out. Put glue on the band and the end of the hat.
Glue the ball on the end. Glue the stretched out cotton ball on the hat to form the band.
Punch a hole in the hat and add string. Then they can hang!
Totally cute "now" Santas!
St. Nicholas Ornament
I found this on a Scandinavian site. It is super simple. A large triangle, a smaller triangle for the face/beard, and a medium triangle that is rounded for the hat! Super simple but a "then" ornament!
Here's how they looked on our tree!
By far the best parts of our study included presentation of
materials by our very own.First, one of
my students was able to share Hanukkah with us.First we read the material and completed our learning.During this time we used her as our primary
resource.The next day she brought in
her book and talked specifically about what her family does.The kids asked great questions and she shared
great information!It was AWESOME!
And, to celebrate in a different way than normal, our
Christmas party was really Then and Now centers!The kids had a real blast!!It was so great!My wonderful, former teacher, homeroom mom
ran the station for quill pens!Her
sister-in-law works at Old Williamsburg and this is her actual job, to use
quill pens and write tickets, etc.My
homeroom mom was given a set of quill pens and she dug them out of her stash to
bring them in to use! The focus of the center was to learn to write like in the
past, because they would write Christmas letters to friends. It was truly
amazing to see the difference in kids’ handwriting.Those that struggle to form letters with
pencils did incredibly beautiful handwriting.(What are we doing wrong today then!)The kids worked diligently to create the letters and really loved this
part of the first station.
My AWESOME Homeroom Mom!
I even had to try! Big letters created splashing. You use sand to blot it up. Small letters were easier and faster to form. Cursive was much easier than print!
To complement this, we created modern day Christmas cards
with stickers and glue!
Our next center focused on a ball and stick game that was
individual.You had to catch the ball on
the big end, the small end, or the stick in the middle.Not an easy task!
While one player was doing this, the rest were playing
holiday bingo!Good stuff!
Our third station consisted of making an old-fashioned
snowman clothespin.The kids loved
adding details to this one!
After they finished this, they created a modern plastic foam
ornament with their picture on it!
Our final center was trying out food from then and now.For then, my homeroom mom cooked up some Wassail (spiced ciderish drink) in a crockpot right in class!The kids were able to taste this drink and
decide if they would like to drink this all the time!Many said yes!The other part of this center was to create a
decorated cookie with sprinkles and the like!Needless to say, it was one of their favorites!
Overall, I’m really pleased with how great this unit is
going.I say going because I’m nowhere
near finished!I still have Jingle Bells and
Skating close reads to go.These are the
most wintery to do after break.I found
this awesome video on Pintrest to go with Jingle Bells.I think it will be a great way to introduce
transportation in the past to my kids. It gets the point across well!
I’ve also learned a few things about kids’ beliefs about "then".They have no concept of how
important fire was to people in the past-that they were not “kept” from
it.What I mean is that I’m sure they
were afraid, it was something to be afraid of.However, not like kids today.They don’t understand that children handled fire, that it was used all
day, every day, for many things.The
conversations about the candles on the tree alone were enlightening.So, I’ll be creating something for fire
too!But, for now, I’m madly creating “The
Sandy Day”,
I'm going to the beach on Friday!
a fun winter project for those of us who don’t have snow or anyone
who would just like to have a fun compare and contrast unit for snow and
sand!