Image Map
Showing posts with label Conceptual Development. Show all posts

January 29, 2019

Book Club for Kids: The Secret of Getting the BEST out of Student Jobs


Book Clubs for kids are a primary tool of reading instruction in my classroom!  They are used in place of Guided Reading instruction and are much more informative than the actual practice of Guided Reading.  One of the secrets to Book Clubs for kids is picking roles, or jobs, that provide the most value to the students and the teacher!  


The boy is doing Book club for kids with a Book Club Job or Role to complete.


Your Purpose Might Just Be Hiding!  


Before we dive into jobs, let's talk a minute about purpose!  Everything we do as teachers should have a purpose.  I have honestly read other teachers share that their Book Clubs for kids have no purpose besides being a Book Club.  This, my friends, has a deeper purpose!  You are using the skill of talking about REAL LITERATURE in a real world setting!  That means you should be diving into researching this topic to build a structure for this talk, a structure to teach real literature without the kids knowing it!  Higher order thinking is your real goal-learn how to utilize it in this setting!  Because everything we do HAS A PURPOSE!  Look for it, it is there!  


The Best Book Club for Kids Jobs!


There are so many ways you can utilize Literature Circle Roles.  These roles were shared by Harvey Daniels in Voice and Choice in Literature Circles.  It was simple then to utilize these roles to teach within Book Clubs for kids.  I used these roles, or jobs as we now call them, with my first real experiences back when I first learned about Literature Circles.  However, times have changed.  The demand of testing and the new Standards that most of us teach under, has really called to us about how to build skills and understanding within the texts students read.  That means we need to have jobs that have the most bang for our buck!  Above all, students need to be practicing skills that can be bridged back to the Standards and meet the demand of testing.  These five jobs do just that!  


Job #1:  Summarizer


This job is just what it is named.  Students write a summary of their reading.  This could be a chapter or even multiple chapters.  This process is key to many smaller parts of a variety of standards.  Determining key details, sequencing, and critically examining the text are ways that students use reading to build a summary!  Plus, students strengthen their vocabulary and writing skills, as they cannot just copy sentences from the text.  This is not a skill to take lightly.  Writing summaries together, giving feedback on summaries written, and reteaching to your class will all be part of this job.  In the end, it is worth the time to do this.  Your students will boost so many reading skills just through learning how to properly write a summary!  Take the time to use this valuable job in Books Clubs for kids!  


Job #2 Questioner


This job is so much more than asking questions.  But, let's start with the obvious!  When you are looking at the basics of the new standards, you will find that many of the foundations start in asking questions about a text.  And, yet, kids struggle with doing this!  They struggle with finding questions with real meat to them.  This can be developed through Book Clubs for kids.  The job of Questioner is about asking quality questions and, also, providing an answer.  As a teacher, this gives me insight into what students are questioning as they read.  When you look at this deeper, you an clearly develop an understanding of their higher-order thinking.  If students are stuck on obvious questions, they are lacking higher-order thinking.  It is my job to begin to cultivate this through lessons.  If students still struggle, it is time for some one-on-one help to build this area up.  Their answer are just as insightful.  A student can ask a great question, but totally miss the mark that their answer can have multiple answers.  It is when students open up to the idea that a question can have many answers that debate occurs-and it does, naturally, in Book Clubs for kids.  

In addition to developing question to ask the group, the Questioner is responsible for running the group.  This starts very early on when I still sit with the groups, especially in the younger grades.  I try to act as a silent witness, offering as little guidance as possible.  This helps in the gradual release to student-led Book Clubs.  I have my students use the Questioner form to work through their Book Club leading.  Soon, students are leading, no matter what their ability is!  


Job #3:  Plot Picker


This job in Book Clubs for kids is another way for students to meet specific Standards that you need to assess.  They need to critically analyze the text to determine the climax of the chapter or section they are reading.  Students must wade through key details to pick the moment that impacts the story the most.  This can be difficult for students since there may be a variety of opinions based on what they are reading. This job, more than any of the others, can lead to a real debate among students-and that is what you are looking for.  Students can strengthen their skills of talking correctly and building debate naturally within the Book Club structure.  Be sure to be watching for it and guiding it along.  I have used good group debates as "fishbowl" moments.  I have the students recreate their debate and have others watch.  This way, we can talk about successful debates and how you correctly talk and react within them.  This words for any grade (I have even done this with First Graders!) 


Job #4:  Character Sketcher


Character Sketcher is 100% looking at Character Traits.  Students must choose a moment from their reading and explain this character through traits that they see in their reading.  This is a key moment to assess the difference between actions and reactions.  This one is difficult for students when it really comes down to it.  They think the characters actions cause the trait, when in reality it is their reactions that are the trait.  Continued practice in Book Clubs for kids is a simple way to build and grow this skill to mastery.  Kids are looking at their character across a WHOLE story, across many events and many interactions with others.  This is what is missing in those guided reading books. (Read more here!) There is not enough depth to characters in these texts to get what students need!  That is why real literature in Book Clubs just does amazing things with students.  And this is a job that proves that fact!  


Job #5:  Connector


Emotions play a huge role in who we are as readers.  This is why this job is important.  It takes the time to dive into the feelings of the reader and to dig into their schema.  I will never forget when one of my toughest fifth graders ever was reading Old Yeller'.  We were in the middle of Book Club and I was monitoring their group.  I was standing behind him when he started.  All of a sudden he broke down in tears.  He explained that when he was younger one of his dogs died and how this story brought him right to that moment and how he just knew how Travis had to have felt.  He just knew it  because it was exactly how he felt.  It was powerful and moving.  We were a tight knit group, so it didn't go anywhere past our classroom-and all the kids hugged hime sometime in the day.  It was real, it was powerful, it was real literature in action!  It was also 15 years ago for me-and it has stayed with me all that time.  That is the power of connecting in Book Clubs for kids!  


Other Jobs


Yes, there are other jobs.  Here is what I have to say about that!  I have tried all of the other jobs and have personally found that they lack the depth of the jobs I have shared here.  These can (and are included in my Book Club products) Word Nerd, Visualizer, Passage Picker, and Travel Tracer.  The problem with these is not found in the job itself.  All have their value.  The problem lies in the sharing of the job.  With Word Nerd, students loose interest hearing words and their definitions.  This can cause off-task behaviors to jump up and disrupt your groups.  I find that if I let kids pick words across the text and do this job as an individual product, I get better results.  Visualizer is a weak job in general.  Students must show a picture and discuss their picture.  I find this amount of drawing, especially with older kids, is not a good use of classroom time.  Again, this one can be used at the end to share "the moment" that stuck with them!  The two that have some traction are Passage Picker and Travel Tracer.  Both look more closely at the reading, but both can be somewhat boring to listeners and frustrating to the student completing the task.  What if they reading only has one setting (Travel Tracer) or too many settings?!  What if the student doesn't like this part of the reading and finds no value in the passages they have read?  All of these are areas I've had students struggle with.  These struggles are an important part of understanding the Book Club jobs presented here!  


Differentiation!  

The good news is that ALL of these Book Club roles can be differentiated to meet the needs of your students.  You will find value in all the jobs presented when you are differentiating.  Each and every one of these jobs becomes important to students if you look at what they need in that moment.  A struggling reader just may need that Visualizing job when they are completing a Book Club.  It's easy to differentiate by having leveled pages representing each job.  


This shows Differentiated Book Club Job sheets for a variety of needs.


Differentiated book club pages are shown in the basic level of learning


Students can easily be assigned what they need, even when reading the same text.  Each of the sets come with their own leveling.  The Basic Set leveling includes a story level and a chapter level that support a larger area of drawing.  Then they move into limited drawing on the page and no drawing, focusing on the written element alone.  This allows for an easy transition into completely written work.  

The Advanced Set includes the first page offered as the limited drawing. Some students in grades 3-5 will benefit from drawing, but I find it is key to keep the written work as the most important element on the pages.  The goal with Book Clubs for Kids in the intermediate grades should always be about what they are presenting to the group in written form, not the drawings that accompany the work.  I think this can get lost sometimes in Book Clubs!  But, just like with the Basic Level of Book Clubs, this set can easily be differentiated to meet the needs of each of the students in your classroom!  

What do you think about these jobs, or roles for Book Clubs for kids?  I'd love to know what works for you, what doesn't work for you, or what you are interested in hearing more of?!  Leave me a comment or hit me up on Facebook or Instagram!  (Be sure to follow to get all the most recent information about my classroom!) 

Pin for Later


This blog post is about how to get the best jobs or roles for your students in Book Clubs for Kids

Read other Book Club for Kids Posts


January 15, 2019

Why I Don't Do Guided Reading! Book Clubs Exposed!!!


Book Club for kids is another name for Literature Circles.


I have lucky to be in on many innovative educational ideas.  I have seen the rise and fall of educational concepts.  It has been an interesting time.  One of the best ideas I have seen, and practiced, is the use of Literature Circles, or Book Clubs for kids.  It is also one of the most under utilized strategies with teachers.  Let's take a look at why!  


Book Clubs for Kids


Literature Circles, or Book Clubs for kids,  have probably been around longer than we can imagine.  I can retrace my experience back to my first year of teaching.  I taught Fifth Grade and had this great idea from college to try out.  My peer teacher was extremely innovative and agreed to let me try them out.  She was a steady novel user herself-in fact, she still is a novel user! (More on that in other posts!) I had used novels right along with her, mainly to get the most band for the buck!  My Brother Sam is Dead is a great example of this most bang moment!  This amazing novel teaches the American Revolution from an amazing view point - that of a Revolutionist who also put his life on the line for his family, all told by his young brother who was not fighting in the War.  Great stuff - but I digress!  So, I gather the texts I wanted to use - The Secret Garden, Alice in Wonderland, The Jungle Book, and Huckleberry Finn.  These books were not a huge jump for my students - in fact, because of what we were reading, they fit right into our class.  I created a project too - they had to write a summary for each chapter and draw a picture to create a Big Book for a younger grade!  All was great - but I had NO IDEA what I was doing!  This was totally unstructured talk with a random project.  I would rotate and listen to them.  They would all write a summary!  Great, but with no real results.  No real ability to "see" what I needed to see from them.  And, so, like so many others, I gave up this very "innovative" idea and stuck to what I was learning from others - the use of really great literature with the whole class.   Until...

Balanced Literacy!


Yes, about ten years into my teaching career, Balanced Literacy was launched.  It was during this time that "Guided Reading" was introduced to us and it was quickly pushed aside by those that I taught with.  In fact, it was a somewhat verbal assault on the instructor of the course.  But, she would not be pushes aside so easy.  Over the course of our year's worth of classes, she began to make headway - with BOOK CLUBS for kids!  She quickly moved from the idea that small readers were for all students into reading novels with older kids.   This brought buy-in!  In fact, she brought us to the point that students in 2nd grade and beyond SHOULD be reading real literature in the form of NOVELS!  And that's where she found acceptance and understanding!  And that's why I don't do Guided Reading in my classroom - in ANY grade I've taught!  Instead, I do...


Book Clubs!!


Literature Circles, or Book Clubs for kids, soon became a big hit with my students!  Why??  Well, there are a number of reasons!  Here's some:

  1. They offer student choice!  We all know that it is hard for teachers to give up the idea that students can choose their own books.  However, that is part of what Book Clubs for kids offer.  Choice gives a student more buy-in.  That means more time on task, a connection to social-emotional learning, a willingness to have cooperative behaviors, and just a better chance to have fun with their reading.  
  2. They provide a chance for differentiation!  That's right!  You can offer a variety of reading levels and topics in one Book Club for kids.  Or, you can go with a theme and offer a variety of levels of reading opportunity!  The opportunities are endless!  
  3. It provides a purpose for reading beyond the idea of taking a test!  YES!  It is real, it is engaging, it is opportunity!  Real literature is used.  Kids want to read when the book engages them-so pick quality with PURPOSE!  Understand what and why you have picked that text to use with them!  And, opportunity is present.  Opportunity to get students involved and loving a book for what it is and what it does for them as a reader! 

What Book Clubs for Kids are NOT! 


I shutter when I hear Guided Reading- for real, I do.  Because it has become what it should not be.  It is, in it's current form, Round-Robin Reading Groups.  Student groupings don't change, they are stuck in a cycle of boredom (and so is the teacher), and we are assessing everyone for fluency OVER AND OVER! (Why?? WHY?? If they are fluent-move ON!)  We don't boost their reading past what we "think" they should be doing!  Reading is NOT A LEVEL!  Therefore, Book Clubs are NOT Guided Reading!  

Book Clubs for kids are NOT a free-for-all either!  There is structure and planning in Book Clubs.  Students have roles and expectations- all of which they must be ready for.  It takes practice and work, but students can quickly learn the hows and whys when presented with opportunities to lead!  

Book Clubs for kids are NOT ungraded!  There are many ways to grade Book Clubs.  Be open to ideas for grading, even from the students.  They know what should and should not be going on in their groups and will be honest about their behaviors and reading.

Book Clubs for kids are NOT unguided.  I carefully scaffold my Book Club instruction.  I start the same for every grade, no matter what grade I have taught Book Clubs in, 1st through 5th.  When they learn the ropes, they learn quality Book Clubs!   

So, now that you are intrigued, I'd love for you to join me in learning more!  I'll be posting some Blog Posts and sharing some over on my Facebook Page!  Stop by and follow me there for my live discussions about Book Clubs!  And, let me know more about what you'd like to learn by leaving me a comment below!  


Book Club Products


Pin for Later!  

Book Clubs Exposed pin for Pinterest.  This post is about literature circles.


Read the next article on Book Clubs for kids HERE! 


January 8, 2019

Get Your Class Out of the Regrouping Rut with BINGO!

Do you love to play BINGO with kids!?  I know that my students LOVE Bingo!  But what they do tend to do with regrouping in addition and regrouping in subtraction is get bored!  So,  why not connect BINGO with kids and regrouping in addition and subtraction!  Let's take a look at why these two skills can be connected to gain academic success!  

This is a square picture that has BINGO for Kids and getting your class engaged in addition with regrouping and subtraction with regrouping.


Bingo Benefits!  


1.  BINGO with kids turns an activity from boring to exciting!  We have all seen it-with almost all games we end up playing with out class.  But there is something special about BINGO!  I don't know if it is the thrill of hunting the number that is called, the risk of winning, the risk of loosing, or all of it combined that makes this game GREAT!  

2.  It grows critical thinking skills - Yep, I didn't believe it till I did some investigation.  You see, when students are playing BINGO, they are forecasting the next set of possible events.  This kind of thinking builds the area of critical thinking skills.  It seems just too simple to be true-but it is! 

3.  It also works on a number of skills under the heading of "sportsmanship".  Students must learn to win,  loose, and celebrate others all while playing this game.  They are social and learn to talk to each other in a way that is acceptable to the category of sportsmanship.  

And, when you pair that with MATH you get a win-win situation!  

The Benefits to Your Math Instruction


Yes, there are benefits to your math instruction as well.  One of the best ways that you benefit is through engagement.  Students are motivated to win the game-and to win BINGO, you must be accurate.  When we play addition with regrouping or subtraction with regrouping BINGO,  I talk to my students about how inaccurate answers will cause them to instantly loose the game! If you don't have the right answer, you can't cross it off for the BINGO!  

Engagement is another area that boosts your math instruction in addition with regrouping or subtraction with regrouping.  When students have a purpose greater than "just practice", students will be more engaged.  These BINGOs have become one of the highest engaged moments in my classroom!  Imagine, students who want to practice this skill, are excited to practice, and have an end game in mind which leads to success!  LOVE IT!  

This is a cover of the Regrouping 2 Digit addition problems by playing Bingo for kids!

                         Play bingo for kids that include problems with 3 digit subtraction with regrouping.          Play bingo for kids that include problems with 3 digit subtraction with regrouping.

Play bingo for kids that include problems with 3 digit addition with regrouping.

How Simple is It?


It's this simple!  

1. Head on over to my TpT Store and check out the BINGO's I currently have available.

2.  Print out how many you need.  There are 25 game boards in each of these! 

3.  Print out the Calling Card - The great news is, you can call these numbers more than once! During our Math block, I am able to have students finish the work and we play BINGO about 3 times!  How awesome is that! 

I hope you have gained some ideas about the benefits of BINGO with kids, even beyond math!  It is a wonderful way to add engagement and fun in your classroom while you build critical thinking skills and sportsmanship!  I'd love to hear how you use BINGO in your classroom - so, drop a comment below!  

Pin for Later! 

This show two girls playing BINGO in the classroom using addition with regrouping and subtraction with regrouping.


January 30, 2018

5 Steps to Creating a Great Anchor Chart WITH Students


This may be an unpopular view, but I'm anti pre-made anchor charts.  With all the Pinterest charts and materials flying around out there, teachers have begun to loose that one thing that matters-the STUDENTS!  We have the shabby chic classroom that means nothing to students.  We have the Pinterestly perfect accessories and the ultra deluxe bookshelves that make everything Southern Living perfect.  Including our anchor charts.  Anchor charts-a tool to teach children.  A tool for children to use.  A tool that is interactive.  A tool 100% designed to be done with children, in front of children, and have meaning to that child because THEY had the learning presented to them in a way that makes sense.  Anchor chart-NOT a poster made at home by a teacher to make sure their class is Pinterestingly Perfect!  

However, even I recognize the need for a great looking anchor chart every now and again. In the age of the Pinterestingly Perfect anchor chart, there has to be a happy medium.  I also get the main goal of time saving.  However, what I don't agree with is the idea that students are presented the information in poster format and having that called an anchor chart.  So, is there a way to combine them into one.  I think so!  

Step 1

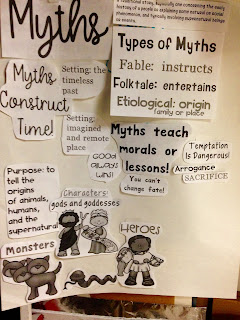
Determine what you want your anchor chart topic to be.  In this case, I was introducing myths to my students.  I wanted to present the facts behind myths to my students.  I started with a large header and went from there.  I had researched the elements of the myth and knew what I wanted the chart to hold. Then I went to designing.  I designed these.  

Step 2

Next, I created a mock-up.  I printed my design in black and white so that I could see how it would fit on the chart paper.  I laid it out with the end in mind-making sure it all fits!  

Step 3

Next I printed the pieces in color and cut them out.  I also clipped them together in the order that I wanted to introduce them to the students.  This way, I was ready and organized for the lesson sharing the elements of the myth.  


Step 4

Present the lesson.  At this point, glue is your best friend.  I kept a picture of the mock-up on my phone so that I always knew what was coming next.  I glued and discussed with the students as we went.  They had lots of questions for each part as we worked, instead of seeing everything at once.  I would have totally lost them the whole lesson with those monsters if I had presented this chart all at once!  They were fascinated with them both!  


These materials will soon be available in my TpT store!

What we ended up with was a great looking Anchor chart that was teacher driven but completed in front of the students.  The students interacted with the material and learned it in a sequence that did not overwhelm them all at once.  Our discussions about each part allowed for the building of the knowledge they needed but, yet, did not give it to them all at once!  

Anyone can develop charts like this.  All you need are some great fonts, some great clipart, and a little bit of time to think it through and type it up-just like any anchor chart you would make without students present.  The difference is, students are present and part of the development when done this way, which deepens their learning!  

I hope this helps you think about how you develop anchor charts with students.  I'd love to hear what you have to say!  Let me know in the comments below!  

This come from my King Midas and The Golden Touch product!  


Pin for Later


January 16, 2018

The Best Way to Build Writers: Modeling, Planning Style!


As I travel through this journey of giving up the boxed writing program, there is one thing I will never give up-MODELING!  Teachers frequently ask me what makes my students become the writers that they are, and that's what I tell them-MODELING!  You have heard it over and over from others I'm sure, but I'm here to tell you, modeling is golden!  It is the very key to successful student writers, with one other thing!

Modeling!  


Where does this process start-at the very beginning.  I model how to make a plan first.  This is so incredibly important!  Students need a plan to guide their writing, but it is the first thing that teachers drop.  WHY?!  I have heard everything- students don't know what to do, they don't use their plan, it takes too much time, it's too hard!  UGH!  This is NOT about us, the teacher!  It is about students making their way in writing, with a view of where they are going in their sight!  Give them the opportunity to have success through planning.

So, how do you model this?  Super simple!  The first thing you need to do is decide on what form of planner you want to use.  I am a Hamburger Planner girl myself!


I have used this planner for years with every grade from first through fourth!  I find the idea to be very appealing to students and it is easy to make the parts valuable to students.  The buns go together-this is a MUST!  Students must understand that the top bun and the bottom bun are THE SAME THING!  The focus of the writing goes in each bun.  Where do you get the focus-from the prompt, the assigned topic, or their own personal choice of topic.  That's the joy of the hamburger planner!  You can use it for all styles of writing and for any topic!  Just a little tweaking to make it work across all the platforms and you're good to go!

Next, students will move into the hamburger layers.  This is where you can talk about all kinds of organizational issues.  This is where organization starts after all!  That's one of the very reasons to plan!!  Instead of students jumping all over as the write,  this can be fixed before they write!  Take the time to talk about this during the planning stage.  Then, MODEL it!  Get a copy for yourself and fill it out.  You are going to be using this to guide your way, so fill it out before the students, not before class!  Modeling only works well live.  Give up your idea that it has to be fancy and beautiful because that isn't going to work.  Talk through your thoughts and the why behind what you are writing on the page.  The more you verbalize, the more students will see that you believe in what you are doing-and that means it WORKS!

You see, that's half the problem right there.  When we offer students criteria and then don't support it with evidence, we are doing the same thing they are when they don't use text evidence.  "It was in my brain." doesn't work when we want them to provide text evidence,  so why would we want that for writing!  Model this step and it will pay off BIG TIME!


An now, for the next best thing to Build Writers-Have honest conversations about what is on the planner.  Yes, that's right.  Ask kids to share and then have an honest conversation about what is on their page.  The key is to wrap it in that general rule of  one positive comment, one suggestion, and one positive comment so that kids are seeing your suggestions as a positive.  Here's a brief example of how this might work:

Conversations

Student: My bun is Winter Break.  My reason one is Isle Maurada, my reason number two is Disney Cruise, my reason number three is running a race.  My final bun is Winter Break.
Teacher:  I love that you are focusing on your favorite thing on your break, which is your Disney Cruise.  Do you think that your order of these reasons makes sense in the order they are in?  Think like a story from a book.  You're ideas are strong.  What can you do to make it make better sense?
Student:  I could put the Cruise first!!

Yep-that was a real conversation.  By simply allow students to take a minute to think about their planner fixed a major writing problem-organization-BEFORE their draft was written.


I hope this helps you to build confidence in planning and using this as a modeling tool.  Take the time to try it, and stick to that planner for writing.   I'll be back to discuss this very thing, so you can see the sequence of how to model with the planner during the writing process.  Until then, let me know what you think, what your favorite planner is, or any ideas that you might have for modeling writing with students.  I'd love to hear from you in the comments!


Pin for Later!


December 26, 2017

Giving Up The Writing Program: What I'm Doing Instead


Throughout your teaching life, you will have moments of discovery-about who you are and what you truly believe as a teacher.  I've had a number of those through my career.  The first one was that I would switch from the traditional method of reading and become a more "Balanced" Literacy Instructor.  Not in the sense that is today's "Balanced" Literacy (Which is a farce-but that's another blog post!) Another was when I discovered that I was truly a great writing instructor-because I loved to write and I learned from the very best!  Karen Padgett-may your retired teacher time be the VERY BEST, wherever you are!  Yes, I learned from a very wise and knowledgable peer!  Not some crazy writing program that everyone hates-but REAL teaching!  REAL TEACHING!  

So, when I found myself saying this, I was completely SHOCKED- "I don't know how to teach writing anymore!"  Yes, I said that-because I didn't.  You see, I've been bogged down in writing programs-Lucy Calkins, Write Traits, Top Score, Making Meaning Writing-you name it, it's come my way.  In that moment I realized I needed to STOP THE MADNESS and go back to the Karen Padgett way of life-write every week with a purpose!  Just Write! (Oh, wait, that was ANOTHER program I tried!)  


Here's how this breaks down day by day:

On Monday you introduce the prompt and plan.  That's it.  The key to this method is in the simplicity of each day.  When students get overwhelmed, they don't produce the writing you expect.  That is what I have learned over the years of teaching writing-small chunks for small kids produced the best results.  And so does planning!  So many people skip this part but it is the KEY to excellent results.  It takes the ideas for writing from higher order thinking to the knowledge level.  (Read more about it here!)  So, planning is KEY!

Tuesday is modeling day for the teacher and writing day for the kids.  Again, I take this in small chunks.  I start with proposing a grabber, or introduction, statement.  Here is something to keep in mind-kids WILL copy you.  That's what modeling is-the opportunity to show a technique.  If they copy it, so what!  Really, I mean that!  They will eventually venture off into something different-I PROMISE!  What you are doing is loading their tool kits with ideas.  You just have to remember that your introduction statement is no different than a list of ideas you would put in a writer's notebook.  Once I get the introduction started, I form my three ideas and add those to my paragraph.  I finish with a strong closing-again, a modeling technique that allows kids to grow their tool kits.  Then, I give students the time to write their introduction-and that's it!  And, yes, I do this week after week!  

Wednesday arrives with a little more writing.  I will often model my opening of the second paragraph.  Then I continue to write while students write their second and, many times, third paragraphs.  This is where I should take a moment and talk about the end of each writing period.  Students are always sharing throughout this process, in the form of the last 5 minutes of the writing period.  During this time I provide specific feedback as to what students have done correct in their writing.  I also provide ways to boost their writing.  This is the specifics of paint a picture with your words, using figurative language, boosting strong verbs, and any other opportunities that present themselves.  I always phrase these things in positives, such as, "One way to strengthen your writing would be...".  This allows students the opportunity to change their writing and for others to apply this same idea.  Many times, I open the writing period with this same technique.  

Thursday arrives as a time to complete any of the remaining body of the essay.  Again, I start with a quick modeling of what I am working on within my own writing.  Do not underestimate this part!  The more we model writing, the better it is for students.  And, it actually improves our own writing!  If we can grow as writers, we can help students grow!  Depending on the process we are at in writing, I may even model my conclusion.  This is where it gets tricky.  You don't want to jump into the conclusion until you are sure that you have modeled it time and again.  But, if we are on a short week, or Friday is heavy, then I will model this process at this stage.  

And, finally, FRIDAY!  As I just said above, on Friday we work to complete the conclusion.  This should always include a restate of the topic, followed by a reminder of the information inside for an expository or informational and an opinion piece.  For narrative, you are looking for a wrap of the ideas, the solution, and a lesson learned.  Model, model, model these ideas!  In addition to this, it is very important for students to then edit their work.  They need to read it out loud to others and check for spelling and grammar throughout the week.  

I am actually super excited to be going back to this method and seeing what my students can do.  Yes, by the end of all of this we will be moving into how to add information from readings into our work to get ready for fourth grade! But, this is where we are going to go  from where we have been!  No more programs, no more jumping around with ideas or things that are taught.  Just modeling, embedding instruction in real learning, and letting kids learn how to REALLY write!  Here's where I'm starting!  


You can find this in my Teachers Pay Teachers store and it will soon be part of my January Writing Prompt Bundle!  I hope you join me in this simplification of writing program, because it WORKS!  Let me know what works for you!  I'd love to hear your ideas!  

Pin for later! 


December 20, 2017

New Year's STEM: Exploring SOUND Energy!


Happy New Year everyone, even if it is a little early!  Or, you may be joining me for a look at this STEM based off a duplicate product found in my store!  Either way, be prepared for some FUN with STEM and Sound Energy! 

In this STEM you will find the following steps:  Ask, Imagine, Plan, Create, and Improve.  I have also included a chance to Reflect on this STEM though a quote provided to inspire deeper thinking about this activity.  It is important to know that while STEMS come with a variety of step models, each of these models cover the same principles within STEM.  The key is that students apply the principals of creativity and engineering.  Students should be developing systems and ideas based on what they see as the best form of applying their personal skills and the concept presented to them in the challenge at hand.  That means you are as hands off as possible.  The only thing I really did in this STEM was to manage supplies, cut the duct tape (because it is REALLY sticky), mark the results, and vacuum after the clean-up (More on how to avoid this from my lesson learned to come!)  So, here we go!

First, students were able to apply their understanding of sound energy from their schema from our lessons in class and from the video suggested in the product found here.  This is the ASK stage!


In the product, you will find an open note taking page and a guided notes page.  With my third graders I use the guided page.  I also let them watch the video once through without taking any notes.  Then, I stopped it at spots so they could write down what they learned because she talks REALLY fast!  You could always swap out this video with another, as the Powerpoint allows you to embed any video you choose (directions are included).

Once my students worked through the ASK stage, they moved to Imagine.  This is where students had to think about the Criteria and Constraints involved in this activity.  In other words, what the could and could not do.  These are established to keep students within a boundary so that they are not getting off task and wasting time going down bunny trails or even socializing.  In this STEM, one of the Criteria is that they must have different designs for each team member's noisemakers.  This was key, as one team got off target because, during create, they decided they liked another noisemaker better.  They all wanted it and headed down that bunny trail.  I was able to redirect back to the criteria to get those students back on their PLAN!


Yes, that's the next step, PLAN!  In Imagine, students are simply brainstorming all of the possibilities that they have.  This PLANning stage allows them to square up the actual plan they have.  In this case, this is where students developed a specific system to make noise and decided on what supplies they needed.  I supplied them with beans, rice, cereal, duct tape (needed but STICKY), paper towel rolls, gift wrap rolls (A parent brought them in!), paper plates, jingle bells, fabric, embroidery hoops, cups, tongue depressors, staplers, regular tape, and glue.  Then I opened my classroom cabinets to them with the understanding that it couldn't be anything that I needed back from them!  Many of these things were already in my room.  I did utilize parents for some of the things that needed to be purchased (beans, rice, cereal, jingle bells).  I gave them a good amount of time to plan.  They did a very good job of planning and knew what they needed when we moved onto CREATE!


CREATE is the time that they will actually BUILD their noisemaker.  I provide a half hour for this step.  This seems to be a fair amount of time for all groups to be able to be ready, based on the STEMS that I have completed so far.  This did not include the time I used to pass out supplies.  I did this pre-CREATE.  I had student team members come to a table area and pick up supplies such as the rice, beans, and cereal.  This is where I didn't think!  Before they started CREATE,  I should have laid down large pieces of bulletin board paper.  We had a little bit of a mess from kids not knowing how to pour the materials.  I was able to show them how to make paper funnels after I discovered that pouring didn't work so well.  I would definitely suggest this for your classroom before you begin!  I haven't vacuumed in years, as we have wood floors at home and I sweep!  It was an experience for sure!  Anyways, students went fully into CREATE mode and were able to complete this step within the half hour provided!

STEM, Noisemakers, Student-Led Learning 

Now it was time to test their systems!  Included in the product is a fun slide in the Powerpoint just for this!  It includes a website specifically designed for detecting sound levels in the classroom with a fun graphic-Bouncy Balls!  I used this and set the bouncy balls on the lowest amount available.  Then I explained we would use the large bouncy balls, as these are the hardest to move!  I also explained to students that they were not to make ANY noise with their voices (unless they made a horn type of noisemaker) because 1.  they could be helping another team win or 2.  they would be getting a false read on their noisemakers.  Then I stood at the board and marked the three highest bouncy balls that each team achieved!  This is how we judged the assigned group winners!


What we did next was even more fun, and this is also where we got into some serious science application!  I allowed kids to group randomly and we tried it again!  And we got totally weird results.  Weird in the fact that we were able to see how variables affect an experiment.  When students were randomly grouped, meaning they were with similar equipment made by other students, our data flatlined!  They were not able to create sound higher than the original groups of differently designed noise makers.  More importantly, they got a hands-on experience with variables!  I love that we could apply that science term and skill in this very minute!  Real life application!


Next, we headed to IMPROVE!  Students were able to look at all the different noisemakers and discuss and plan for even better noisemakers.  Also included in this was an opportunity to reflect.  IMPROVE doesn't always have to be about the STEM.  It should also be about how they could be better as students-with each other and within creating and growing.  Right now I'm getting a lot of "we worked good as a team" instead of those deeper reflections as a cooperative group.  That is going to be one of my goals as we get more and more into learning about how we work together in STEM and how this connects to us working as a team in other areas of our classroom.

I'm totally excited to add STEM to my growing knowledge of the Student-Led Classroom.  I can honestly say, I can see this being key in the development of how students lead in a classroom setting.  If you'd like to learn more about Student-Led Classrooms, jump over to my general post called Just the Place to Start.   Are you interested in checking out my growing STEM products?  Check them out over at my store, The Best Days!

More importantly, thanks for stopping by.  I'm super excited you did and would love to hear any feedback you have about STEM or this idea, in general.  I'm still learning and would love ideas, suggestions, and even improvement ideas you may have!


June 7, 2017

Project Based Learning: Shedding the Light on Area and Perimeter


This year's testing anxiety, both in students and teachers, is OVER!  Thankfully!!  However, so is my math book!  Yes, I know! Years ago, a math book was viewed as a holy grail in teaching.  It was, literally believed, that if you finished your math book there was something wrong with you!  You went too fast or taught too little!  Your students didn't master the  material!  Because, honestly, that's what math was all about-mastery!  In our high stakes testing systems, it is now about production line work!  Get it done-faster, incomplete, and without mastery-or your test scores will suffer!  Many times, we do our quick little "project" based questions at the end of the chapter and call it a day!   They "really" shed a light on what kids know, right!  (I can hear you laughing now!)

So, with the dilemma of no more 3rd grade math to teach and a number of weeks still at hand, I set forth on a quest to really "see" what my kids really knew about area and perimeter with this gem-Build a Park Project!

Let's start with what I really thought shall we!

Misconception #1:  
This will only take a week!

I figured the kids would whip out the required elements and the poster, and poof-done!  Now, the reality is, I was a little bit crazy when I thought this!  I've done tons of project based learning.  I know better!  But for some reason I was totally wrong about this one.  I had safely given them 5 days to plan and 5 days to "build".  I quickly realized that the planning was the deeper problem in this activity.  This leads to misconception #2.

Misconception #2:  
My students know how to use the formulas for area and perimeter!

HA!! Now I can laugh at that!  From my brightest to my struggler, they were just counting.  Over and over again, just counting!  We had completed lessons, we had used the formula.  It didn't matter-JUST COUNTING!!  This was quickly evident when none of them KNEW the formulas, even though we had just finished the chapter about a week before!  JUST COUNTING!  This was eye opening!  When we assume from a chapter that they get it, we are doing just that, assuming!  Our biggest struggle came with perimeter.  They could quickly adapt to the area formula-length x width- but the perimeter was a whole different thing!  They relied so much on counting that they didn't even know what numbers to add!  Yep, major misconception on both of our parts!


You can see the planning stage here.  This is where counting took place, from their rough ideas. This led to many problems in calculating using the formulas.  


Misconception #3:  
Required elements are required, right!

I have completed projects with my students that had required elements.  They were successful at that!  In math-it was like a whole new idea!  I had kids creating things with ZERO required elements.  Once I started checking here and there, it was like a lightbulb went off!  I had one student who had to scrap her whole project because they didn't understand that the list I went over and specifically said they needed was, well, required! So, this was another eye opening thing for me!

I worked with this student to adjust some "required" elements because they clearly knew the math on paper but just "missed" the idea of what "required" meant. 

Misconception #4:  
"Doing" the math will be easy.

When you are looking at basic adding and multiplying, you would assume that these are easier skills that students can complete.  However, this is a crossing over of skills, making it more complex.  This means that divergent thinking had to mix with convergent thinking (a concept I am currently reading about in a book called Make Just One Change.)  This cross over meant many easy mistakes being made.  Could they pull the numbers they need and then make them equal to what they "THINK" the area or perimeter was.  They wanted to draw squares instead of use lengths and widths in their drawing.  That meant skipped squares or unequal rows and columns.  That equaled FRUSTRATION!  Nothing that couldn't be solved, but they just couldn't "see" how the error in their drawing made the error on the math page.  Very enlightening I must say!

This shows that this student did not connect the area formula of 6 x 5 = 30 to how it should be correctly modeled.  

Misconception #5
Presenting an idea will be easy with the R.A.F.T. method, after all, that's what it is for! 

If you have never heard of the R.A.F.T. method,  you are missing out.  This easy to use writing strategy is a fun way to motivate students to write.  The have a R. role, A. audience description, F. format  for a topic to be written as, and T. the topic to be written about.  I motivated them with this idea:

Yet, I got everything from a minute of sharing which sounded blah to a full fledge sales pitch.  The R.A.F.T. did motivate them, but I did not give enough information for all kids to really get it!  So, I got wise. While kids were sharing projects, I jotted a few great ideas I heard and, with that in mind, created a guiding document to help the students next time!  Here are some of the great ideas I heard from their presentations:

        *Share the name of your park (obvious, yet missed by many)
            *Include the theme of your park and why it is that theme
            *Share important locations and how they can be enjoyed by "guests"
            *Include a reason to invest in your park-what are the best qualities?
            *What is the price range to invest in your park?  (This is a great practice in place value and
              the value of land, etc.


This was one of the projects that had a full sales pitch as well!  


That about wraps these misconceptions up!  It was truly an enlightening thing to do.  The BEST moment of this entire experience was when my true math struggler made a HUGE connection between the formula and the shape, something this student had missed all along, even when counting. This student had that sudden light bulb moment where they literally went "OHHH!" when writing out the perimeter formula!  This child also scored the best they have ever scored on anything in math because other qualities emerged.  Their ability to give a good presentation, the detail they put into the project that others did not, the pure success this child felt all became a key component in the end result.  It truly reminded me of the reason why we must be do projects in math-and it will spur me on to find more!  

So, here it is!  

As you can see, this project is fun and informative for both the student and the teacher.  And, you get everything you need to complete this project and assess their work.  It really is an amazing project that I am so glad that I completed with my students and hope that you will complete with yours!  Let me know what you think by adding a comment too!