Image Map

August 13, 2013

Informational Book Lesson Plans (and Weekly Homework Too!)


After a long first day back, I’m working on a blog post!  I decided that if I don’t do it now, I wouldn’t get to it this week.  Plus, I've been slowly working on informational book lesson plans.  My teaching partner, Lisa, and I wanted to start with a book called Plagues, Pox, and Pestilence, but Scholastic no longer has it available.  So we had to hit it with another angle.  Text structure is one of the first things on our district road map, and we want to tackle informational texts right from the get-go.  As I've been investigating this, I've discovered it isn't such an easy find.  The stuff out there is about the skill-sequencing, compare and contrast, etc.-and not so much about how to teach the structure itself.  Also, it’s hard to find a whole text on each topic.  They are all embedded within the writing in one book.  Some of the readers the series provide have these structures, but I’m saving them.  More on that later.  So what’s a girl to do?  Use what you have!  And what we have are the National Geographic readers that come with the science series our district offers.  I have gone through and found parts of the first three texts that represent each type of text structure.  From that, I will build our “you do” portion of the lessons.  We will still use Plagues, Pox, and Pestilence, but now it will be portions of it instead of the whole text.  (It’s a fun way to introduce some of the various sicknesses that kids come across in books.  They approach it in a way that is easy to understand and is nonthreatening.)
With that being said, we now have a “Teacher does”, a “you do together”, and now comes the big reveal-a “you do independently”.  Here’s the first thing I’ve done.


In these two crates are single copies of informational books I’ve gathered over the years and from our current reading series.  These books will be used on a weekly basis.  Students will pick a book, on any of the topics presented, and complete an informational text assignment.  The generic questions are intense enough to make them think through the process, but provide for a different experience each time they read a new book!  I’m kinda excited about this.  Below are samples of how the pages look and work! 


Find them here!


         Along with this, I am working on some pages to accompany the lessons we will teach on text structure.  Once we try them out and they work, I’ll get them posted!  It will give me some great things to write about!  For now, I’m off to think about all the things I have to do in the next day and a half before open house!  The list is long, it always is!


August 5, 2013

Florida Government Project


           I LOVE it!  The craziness of a moments thoughts coming to life in the form of the very project I imagined!  I have been working like crazy on the government project and finally got a chance to put it together and make it come alive!  Here we go!
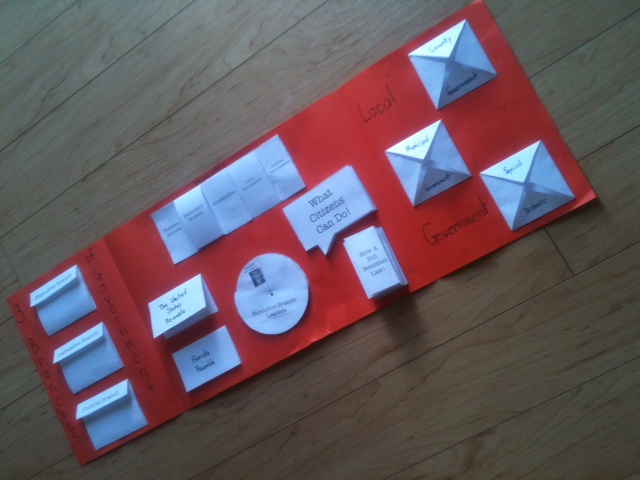
            First, I printed everything.  When I print for the kids, there will be a few things to consider.  As you can see, I printed everything in black and white.  I will be printing the covers in color when we make them in class.  Another thing to consider is if you want the pages to be all white or if you want to add a little color.  I think I am going to add some color.  Blue and green will look great with the orange background.  I picked orange due to the fact that, well, if Florida were a color, it would be orange!  Oranges, orange juice, Tropicana-it’s what I think of when I think of Florida. So, orange it is.  One other thing to consider when printing is how many you will need for your class.  For instance, the local government foldable is one you can save copies on.  Students need 3 boxes, so the second page can be reproduced fewer times, as students would only need one box from that page.  Also, if you do any of the activities, such as the Venn diagram, cooperatively, that means fewer copies!

            Then, I cut like crazy.  I think I will have the kids do the same thing, cut out everything first.  I plan to have them place it in a zip lock with their names on it.  I also think I will collect everything each day to keep it safe.  I can see how they would be able to loose pieces in their desks if I don’t! 

Also, there’s gluing!  You will need two pieces of construction paper to glue together.  I crossed over about a ¼ of an inch.  Because I was in a hurry, I didn’t let everything dry thoroughly. 

Then I folded in one end to meet the middle of the paper.  For kids, point to the fact that this is where the crossover happens. 

Then you fold with the other end. 

This is where it gets fun. The front cover should be separated on the dotted line down the middle of the page.   Glue one side down, being sure that it is right on the edge of the opening.  Then glue the second page on, repeating the same process.  This allows the cover to look like one piece when closed, yet still allow it to open up for viewing.


Once you glue that together, you can glue together the other pieces.  Below are pictures of how to glue together the “How the Bill Becomes Law” and “What Citizens Can Do!” foldable. 


Put the glue on the tab for the “How a Bill Becomes Law” foldable.  Glue that behind the first piece of the foldable to make one long strip.  Then, when it is dry, fold the paper in a fan fashion on the dotted lines.  The tab that says glue down will hold the foldable in place. 

For the “What Citizens Can Do!” foldable, fold the “glue here” tab into the foldable.  Put glue on the tab and then connect it to the second piece.  This will allow the foldable to be one long piece.  Glue the last part to the folder.  Students can actually write on either side of the foldable. 

This is the vocabulary foldable.  Cut out the rectangle out and fold down the middle of the piece.  Once this is done, cut along the dotted lines to make the flaps that flip up.  This gets glued down on the side that is marked in the document. 


The 3 Branches of Government section is made in a similar fashion to a match book.  Cut out the rectangle boxes.  Fold the box on the line.  

This will create the catch part of the matchbox.  Then take the bottom of the rectangle and match it to the fold line UNDER the title and crease the area to make the rest of the matchbox shape.  You will glue the back of the matchbox to the folder. 

One tougher foldable to do is the “Local Government” foldable.  It is a four-corners foldable.  Cut out the squares.  Then take a corner and meet it to the middle.  Crease the fold.  Move on to each corner until all 4 are creased.  The idea was to have the dotted lines on the INSIDE so that they students had an area to write the 4 facts they need to report on in that portion of the activity.  


The Executive Branch Leaders is a multi-step activity.  First, students need to get one strip of the pictures of the leaders.  (Please note, the ? is because there is no lieutenant governor at this time.  I will update once one is appointed.)  They will cut out the pictures and glue them onto the correct title.  They also need to write the name of the leaders next to the picture.  Then they will cut out both circles.  On the second circle, they will cut out the dotted area.  Once the picture circle dries, students can use a brad to pop through the center and create a wheel.  Then they can view each picture of each leader. 


Both of the preambles are easy to create.  Cut out the boxes, fold, and glue down in the correct location. 

            One thing to also think about is how you want the kids to complete the work.  I think I will have them do each section BEFORE gluing.  I just think that it will be easier to manipulate the papers before they are glued in.  I’m actually really excited to try this out this year.  There are a number of additional resources packed inside this activity.  Below are some of them. 

There is also a lesson on primary and secondary sources and a rubric for grading! 


Tell me what you think by leaving a comment below!


August 1, 2013

So Cool, I had to Wear Shades!


     After being Social Studies crazy yesterday, I had to wear shades today.  Shades of meaning that is!  I got this other crazy idea last night, while I was trying to keep my eyes open!  How in the world was I going to actually teach shades of meaning besides my basic plan?  Time is running out!  I go back in a week and a half!  I have to start getting some of this stuff completed-as in not just running around in my brain waiting for the perfect moment to jump out and be done. Because we all know that is exactly what happens once school is back in session.  It runs around and around the brain until it bursts out, unchecked, and unprepared.  Then we do a Tim Gun-we try and make it work till next year, when we can do it better!

            Shades of meaning have been around forever, the idea that words have different intensities that can be traced back to a simple word with a simple meaning.  Take “happy” for instance.  When we think of happy, we probably begin to think about all the words that mean the same thing.  When we read, we infer all the time using shades of meaning.  Adult brains do this automatically.  Student brains are still building their databases.  So, the idea of shades of meaning type questions is to begin to challenge their brains to make connections to words in their databases based on the words around it and then infer what that word really means.  Students have to infer the emotion or feeling from the unknown word and connect it to a basic word choice.  Sounds somewhat easy, but it isn’t.  This is on the moderate level of complexity when you look at Webb’s Depth of Knowledge chart.  When looking at what is expected, however, we discover that kids have to determine why an author uses one shade over another or how a more instance word is used over another to impact a character trait.  That’s some pretty deep thinking for a lot of kids! 

     The good news is this is a skill that can be impacted with practice!  Round one of this practice will be to look at words and discover that they are connected in word families.  This, to me, helps me connect the idea to fact families.  In math we look at 3 numbers and determine how they are connected through addition and subtraction or multiplication and division.  In these word families, we will look for how the simple word connects to the more intense words across a FAMILY TREE!  Oh, I like that!  Each generation gets stronger and more intense, yet each one has the trait of the original member!  (Wait, is that science creeping in!)  And words can branch off with different meanings too!  Then we will examine them on a continuum.  How they become stronger as they move across it.  They will follow that up with some sentence work.  They will finish strong with picking another word in that word family and adding it to the tree!  I think this is a good place to attack this kind of work.  Once we are going strong with this, then we will begin to pick words out of our reading and apply the process randomly on the continuum.  But that will be a topic for later! 


Now, I have some ideas that I will be working on for that family tree!  Once I sort that out, I’ll post and share!  Until then, here’s my finished project! 


  Get 8 premade pages of the continuum with the word lists to go with them.  Some of the words have up to 4 meanings attached to them, so in reality, you could have 22 continuums from this pack!  Some can be done as introduction lessons, cooperative learning activities, and independent work!  The words included are:  happy, good, hate, weird, yell, mad, cool, and bright.  As I was working these out, I also realized that they are great support pages for strong words in writing.  It’s like a bonus!   I can’t wait to try them out myself! 


July 31, 2013

Social Studies Craziness!


     Thank goodness my technical difficulties are now completely finished!  I got my computer back from the repair shop and now it charges and I can type without my fingers messing up on the j and u!  Pure heaven!  But, then again, maybe I’m just going the other way too.  At least I feel that way at this point of the day!  It’s been Social Studies Craziness all day today!


     Here’s what I’ve been working on.  I know it is a rough sketch of a crazy idea, but it is totally coming together in the document I’m working on.  It is a Government Project made from foldables.  Homeschoolers know it as a lapbook.  The idea is that you create a folder and put all kinds of fun stuff inside while you are learning about a topic.  The foldables inside the folder make it fun to read and learn.  What a better way to learn about the not-so-hot topic of government!  I think the kids are going to just LOVE it!  They will get to use computers to research some of the information, do some drawing, and learn at the same time! Here are a few sneak-peaks of the pages!


     The craziest part was I decided to build in some formative assessments as I went. That was not in my original plans, but, when I looked at the road maps (that, my friends, is such a dreaded word to me), I decided they were a necessity!  I found this cool little website on some quick formative assessments:


I decided to try out the one called “As I see it…” for one of the quick assessments at the end of the lesson.  Here’s a sneak-peak of how it looks!


      Overall, I’m really excited about this project.  I haven’t been able to print it off and build it, so it won’t be up this week.  I would like to get it up as soon as possible, because this is our first unit of study for Florida!  I just have to make sure it all fits. The nicest thing about it, the kids do the work.  There is nothing better than facilitative teaching in my opinion.  And this will be one of those moments!

Hope you like it.  Leave me a comment to let me know what you think so far too! My next crazy Social Studies project-Explorers!